


I don’t know if I’m just more in-tune to it lately, or if there really has been a surge in the popularity of granny squares these last few weeks, but ever since I started work on Eamonn’s blanket, I’m seeing them all over the place. I had intended to show you this new blanket when it was finished, and then maybe give you a little overview of how it was done, but given this possible Granny Square Fever, I’m thinking that you might be in the mood to crochet along with me. Right This Very Minute. What do you think?
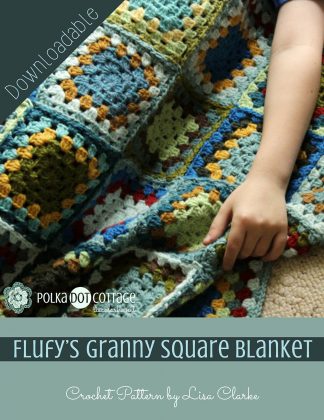
I’m currently on the third column of what I plan to be a 10-row, 8-column blanket (I was on column two last weekend when I took these photos). That’s eighty squares in all, resulting in a roughly 5′ x 4′ lap blanket. It’s a little big for a lap blanket, but Eamonn wanted it to be large enough that he could sleep under it sometimes.
Today, I will talk a little bit about color choices, how to make a granny square, and how I’m assembling the squares.
Once the squares portion is done, I’ll come back with part two and show you how I am doing the border, and any other finishing touches that seem important. Look for that in a month or two!
Required Skills
You don’t need a whole lot of crochet skills to pull this off. If you can:
- make a slip knot
- chain
- slip stitch
- double-crochet
then you can do this. And if you can’t do those things, there are many books out there than can help, as well as YouTube videos, and some great online classes. I had a nice experience taking Linda’s Crafty Crochet Embellishments class.
Materials and Tools
- yarn (roughly 3000 yards)
- hook
- scissors
- tapestry needle
For yarn, I chose Berroco Vintage. I wanted something inexpensive (but not cheap) and washable. I’ve used this yarn before, I know it feels nice and holds up well, plus I had plenty of colors in my stash already, so it was kind of a no-brainer.
I’m using a G hook (one of the ones I made). With this yarn, it results in a nice, drapey fabric.

Color Choices
What makes this blanket different than a generic stash-busting granny-square blanket is that I have been very purposeful with my color choices. Any time I am arranging a collection of squares like this, I want them to look random without actually being random.
I started by asking Eamonn what color family he wanted for the blanket. He chose bluish greens. (Like mother like son [and brother] I guess!) I chose a nice little pile of aqua-adjacent colors to buy, and supplemented with some blues and greens from my stash. We’ll call these the Main Colors (MC).
Then (and here is what I think is the key to making this blanket interesting), I picked out a couple of golds and a red. I also supplemented with some golds and browns from my stash. These colors are roughly opposite the blues and greens on the color wheel, making them complementary colors. Their job is to add visual interest, but in a very controlled way. We’ll call these the Accent Colors (AC).
Each square is built like so: three rounds of MC1, one round of AC, one round of MC2, one round of MC3. Any of the available MC’s can been chosen to be MC1, MC2, or MC3, and the same goes for the available AC’s. The only restriction is that the colors chosen for the current square can’t have been used in any of the adjacent squares on the blanket. This last rule isn’t always possible to follow, but I have been giving it my best shot.
Essentially, each square has a large blue-green center, followed by a gold-red stripe, and two blue-green stripes.
[If you wanted to make a blanket in another MC family, say purple, just follow the same rules, using all purpley-pink colors for the centers and two outer stripes, and then look across the color wheel for the ACs, in this case yellowy-greens.]
Making a Granny Square
This is how I make them. If my efforts of reverse-engineering her collection are any indication, this is also how my grandmother made them. (If you need to see it demonstrated, these YouTube videos by bethintx1 might help you, as they did me, when I was learning.)

MC1: make a slip knot and ch 4. Sl st into the first chain, making a ring.

Round 1: ch 3, 2 dc into the ring, ch 2, (3 dc into the ring, ch 2) 3 times, sl st to join to the 3rd chain st from the ring.

Round 2: ch 3, 2 dc into the space just below the chain, ch 2, 3 dc into the same space, ch 1, (3 dc into the next space, ch 2, 3 dc into the same space, ch 1) 3 times, sl st to join to the 3rd chain st from the previous round.

Round 3: ch 3, 2 dc into the space just below the chain, ch 1, (3 dc into the next space, ch 2, 3 dc into the same space, ch 1, 3 dc into the next space, ch 1) 3 times, 3 dc into the next space, ch 2, 3 dc into the same space, ch 1, sl st to join to the 3rd chain st from the previous round.
If you’ll notice, what you are really doing here is two sets of three dc’s separated by a ch 2 in every ch 2 space from the previous round, and one set of three dc’s surround by ch 1’s in every ch 1 space from the previous round. All future rounds will follow this pattern.

Switch to AC. Last month I would have told you to start your new color with a slip knot and weave in the ends after the square was completed. You can still do it that way, if you like, but I have to say that this YouTube video has changed my life. Perhaps that sounds a bit dramatic. Let’s just say that if you are ok with knots, you can learn how to make one that is super secure and allows you to join colors without ever having to weave in any ends. I’m all over that.

Round 4: follow the same pattern as with the previous round.
Switch to MC2.

Round 5: follow the same pattern as with the previous rounds.
Switch to MC3.
If this is your first square, then you’ll crochet this round just like you’ve done all of the previous ones.
If this square is to be attached to one other, then crochet along your current side, turn the corner, crochet the second side, turn the corner, and crochet the third side up to the corner. Do the first half of the corner (3 dc, ch 1). Attach to the blanket as shown below.
If this square is to be attached to two others, then crochet along your current side, turn the corner, and crochet the second side up to the corner. Do the first half of the corner (3 dc, ch 1) and attach the two sides to the two other squares as follows:

Place the current square directly below the older square. Insert the hook into the rightmost corner space of the upper square and ch 1. 3 dc into the corner space of the current square. Continue crocheting across the top of the current square, inserting the hook into the corresponding space of the upper square each time you ch 1.
When you get to the next corner, ch 1 into the upper square, ch1 into the square to the left, and then continue crocheting down the left side of the current square, attaching it to the left square in the same manner as you had attached it to the square above.
Sarah London (of Granny Square Love fame) has a snappy flickr photo tutorial for joining squares, if you need to see it another way.

Complete your way around the current square.
Break the yarn, remove the hook, and pull the tail through the last remaining loop, pulling it tightly to create a knot.

Now there are only two tails to weave in. I like to take care of that now, so that I’m not grumbling my way through 160 ends all at once when I’m done with the rest of the blanket.
So there you have it! Once you’ve made your first square, you should be an expert, as it’s the same several stitches over and over again. The variety of color keeps it interesting. In fact, choosing the colors for each square is one of my favorite parts. Eamonn likes to help me with that, too. It’s a great way to get the recipient involved in the making of the blanket, especially if he’s old enough to follow the color selection rules that you’ve laid out.
Meet me back here in a month or two, when all 80 squares have been completed, and I’ll show you how to make a border, and any other finishing touches we might want to add. When you’re finished with the center of your blanket, visit Part Two of the tutorial and learn how to add a border and finish it up.
Oh! and please tell me if anything here is not well-explained, or if you notice an error in my pattern. I really want this to make sense, so I will be happy to take the time to clarify any steps that need it!
Happy hooking 🙂
THERE’S AN EBOOK
This project is available as a handy PDF in two flavors: a step-by-step photo tutorial, and a pattern-only version for the crochet-savvy.
Thanks for your continued support!


Absolutely nothing would make 80 granny squares interesting to me. I give up around sixteen most of the time. Sometimes nine. Which is why I join them all at the end, so I can chicken out at any non-prime number. 😉
Well, I have to say, if I stopped now, I’d have a lovely 10×3 shawl. There’s always a way to chicken out 🙂
Nice tute! RT @lclarke522: Blogging: Eamonn’s Granny Square Blanket, part one http://t.co/irCfjFUw #crochet #tutorials #blankets
This is just great, Lisa. I love your color selection and how you did it. I’m not a crocheter right now but am beading and I can use these color “rules” for beading projects. I have a zillion color wheels around here (somewhere) and do I ever think to actually use them? Nope. I will now for sure. Thanks so much for this post. Your (Eamonn’s) blanket is just beautiful.
It’s funny. I don’t actually *use* a color wheel, but I seem to follow the rules intuitively. It makes it pretty handy, when I want to explain how to do what I did!
Wow, the magic knot video was amazing. I have never seen a knot like that and was amazed to see how secure it was. I will have to try it. I would be nervous to cut the tails completely off. I’ll try it on a dishcloth first!
I love granny squares too and look forward to seeing your finished blanket. Thanks for sharing your journey.
I was nervous at first, but I went for it anyway, and the knots are holding quite nicely!
I’m a “lefty” & tried over & over to do a magic circle & each time the circle fell apart like a little kid trying to tie his shoe. I even looked on a U tube video & didn’t make it so I went back to my old way. H-E-L-P! I taught myself to crochet by reading the directions “backwards” over 40 yrs ago so I’m not new to crochet. I love It!
Hi, Judy. I don’t actually use a magic circle in the tutorial for these granny squares. Instead, I chain 4 and slip stitch in the 4th chain from the hook, which makes a loop to crochet into for the first round. Hope this helps!
Granny squares must be the ” comfort food” of crochet. It’s been a long time since I’ve made anything from them, but you make me want to! My great grandmother ( I am 60 …ugh!) so you know that was a while back, made tons of granny square afghans. She always made the first round red, reminding me of a flower. The rest of the squares were randomly colored but the last round was always black. I remember one that she made my Mom that was bordered in turquoise (Mom always said she loved any color as long as it was blue!). I like your method of joining; I think she always sewed them together. I remember her having stacks of squares, probably in groups of 10, tied together. Mom said she (my great grandmother) wasn’t great at weaving in the ends and sometimes that caused holes/ unraveling. I try to be careful about that. I have some hooks coming from you any day now, one of them a “G”, also my hook of choice. Can’t wait!
Wow, your great grandmother? My own great grandmother did the granny square thing quite a bit, too. I remember an old granny square blanket that spent its days in the living room of my grandparents’ house. I believe that my great-grandmother made that (although I could be wrong), and it had a black border around all of the squares, too. It must have been the way it was done, all those years ago. I tend to think that our ancestors would be completely overwhelmed by the staggering choices we have in yarn nowadays!
I hope your hooks arrived and that you’re loving them!
I love your choice of colors, Lisa! Eamonn’s blanket is looking great so far and you’ve inspired me to search out the unfinished granny square blanket I abandoned to a basket in my studio years ago. In blues and purples, it would make a great little cozy blanket for my 3-year-old granddaughter now. 🙂
I love your clear concise instructions, especially the part about joining the squares. That was always the most challenging part – joining all those little squares after they were made! I’m looking forward to seeing the finished blanket. Enjoy the process.
Cheers,
Karen
Thanks! He picked some of my own favorite colors, so it hasn’t been hard forcing myself to work on this 🙂
That sounds like a perfect use for your unfinished blanket! I like the join-as-you-go approach I’m using for this blanket. As much as I love having a pile of separate squares to arrange and re-arrange, the thought of putting eighty of them together at the end doesn’t grab me!
Thank you for the pattern. I have started my own granny sq. blanket. It’s a fun thing to do while watching Emma. You used beautiful, warm, cozy colors.
Thank you. I hope you enjoy your own blanket-making time 🙂
[…] granny squares that keep popping up online (see Lisa Clarke’s post) intrigued me. I bought this sweater to try to get over my new obsession. Rather than invest […]
am diggin’ the colors!!
Thanks, I really love those colors, too!
Some people can really pick good colors to go together. I have to scratch my head a lot. Keep threatening to get a color wheel. Would that help?
How many different and color buttons do you make?
Have a JOYful weekend!!
A color wheel might help. It’s hard for me to say, since it seems to be such an intuitive thing for me. One thing that complicates the matter, I think, is the idea that you don’t just have to pick colors that look nice together, you also have to be concerned with contrast. In other words, some of those colors should be on the lighter side, and some should be darker, so that any patterns you make from them are well-defined.
I forget if you told me what your craft is? If you’re talking about polymer clay, you would probably learn a lot from this great book. Another good one is Color Play. It’s aimed at quilters, but I think the concepts apply to many media.
I’ve made up a lot of different color schemes in the last several years. The ones I use the most can be seen here. (Sorry if that page is a little bit messy – I am not actively maintaining it anymore.)
Hope this helps!
[…] […]
I just found your blog here and I love it! I’ve tried and failed several times to learn to crochet but found a pattern to do granny squares and granny hexagons on the loom have yet to try it out as I’m finishing up b’day gifties! can’t wait for your finished project
You mean granny squares on a knitting loom? How intriguing! I didn’t know such a thing existed. I’ve got five columns done now, and the last three are in various stages of completion. I hope to have a chance to post an update this weekend!
I’m looking forward to seeing it Good luck!! Finishing a scarf for my dad then some dishcloths THEN going to try some granny squares. Here’s the link if you’d like to see how theyre done! http://www.box.com/shared/vg5rzrggg8
Thanks for the link. That looks interesting! I think that knitting with a loom is far simpler than knitting with needles, but after looking at that link, I’m not sure I could say the same for crocheting with a loom. It looks complicated!
[…] […]
[…] […]
[…] […]
[…] Eamonn’s Granny Square Blanket […]
[…] Eamonn’s Granny Square Blanket […]
Dear Lisa , thank you for your beautiful pattern. 😉
I’m a “lefty” & I tried to do a magic circle but it fell apart like a little kid trying to tie his/her shoe.
Your tutorial hit the spot! I’m finally crocheting a granny square again and am inspired to write on my blog too. Yay and thank you Lisa! You are my inspirational blogger.
Aw, that’s really sweet – thank you!
I haven’t crocheted in a few months and I’m starting to get the itch again…
I don’t have a large following on my blog (yet) but I did add a link to your tutorial on my post. All credit is given to you, of course. I hope that is ok. Should I have asked permission first?
You are welcome to link to whatever you like! I appreciate the word of mouth 🙂
Love your afghan! Wondering how many skeins of each color you used.
That’s a hard question to answer, since I pulled heavily from my stash. I can tell you, though, that I used a total of about 3000 yards. (I weighed the blanket to figure that out.) I estimate that it was 10 to 12 hanks of the blue/green colors and 3 to 5 hanks of the red/yellow colors. I hope this helps!