Welcome to the Beginner Button Class! For this first lesson, we will discuss how to prepare polymer clay for use, how to make a 1/2-inch solid-color button, and how to properly bake it. We’ll be making six buttons, two in each of three colors.
Supplies + Tools
- 3 packages of Premo! Sculpey polymer clay in your choice of colors. You may be tempted to use the less expensive Sculpey III clay. Sculpey is not as strong after baking as Premo is, and for something like buttons that will take significant wear-and-tear, including machine washing, you want to use a material that will hold up.
- Something to cut with. I like to use a Clay Blade, but they are very sharp, and if you are more comfortable with an x-acto knife, an old kitchen knife, or even a plastic knife, that will do for these purposes.
- A medium size metal knitting needle. Mine is, I think, a US #8.
- A work surface. I use a 12-inch square ceramic tile that I picked up for about $1 at Home Depot. Some people use marble tiles, some use glass. If you don’t have any of these things, a piece of parchment paper taped down to your table could work in a pinch.
- A regular oven, convection oven, or toaster oven for baking your buttons, as well as a tray or tile on which to set your buttons while they bake. I use my home oven, and a homemade contraption I will discuss in more detail later.
Safety note: Any kitchen tool you repurpose for working with clay must then be dedicated to craft use, and not returned to the kitchen!
Supply note: If you want to buy online, I recommend Polymer Clay Express for the clay and the blade (and for the lucite brayer or rod I will be recommending in a future lesson). You can also follow any links above to buy on Amazon.
Directions
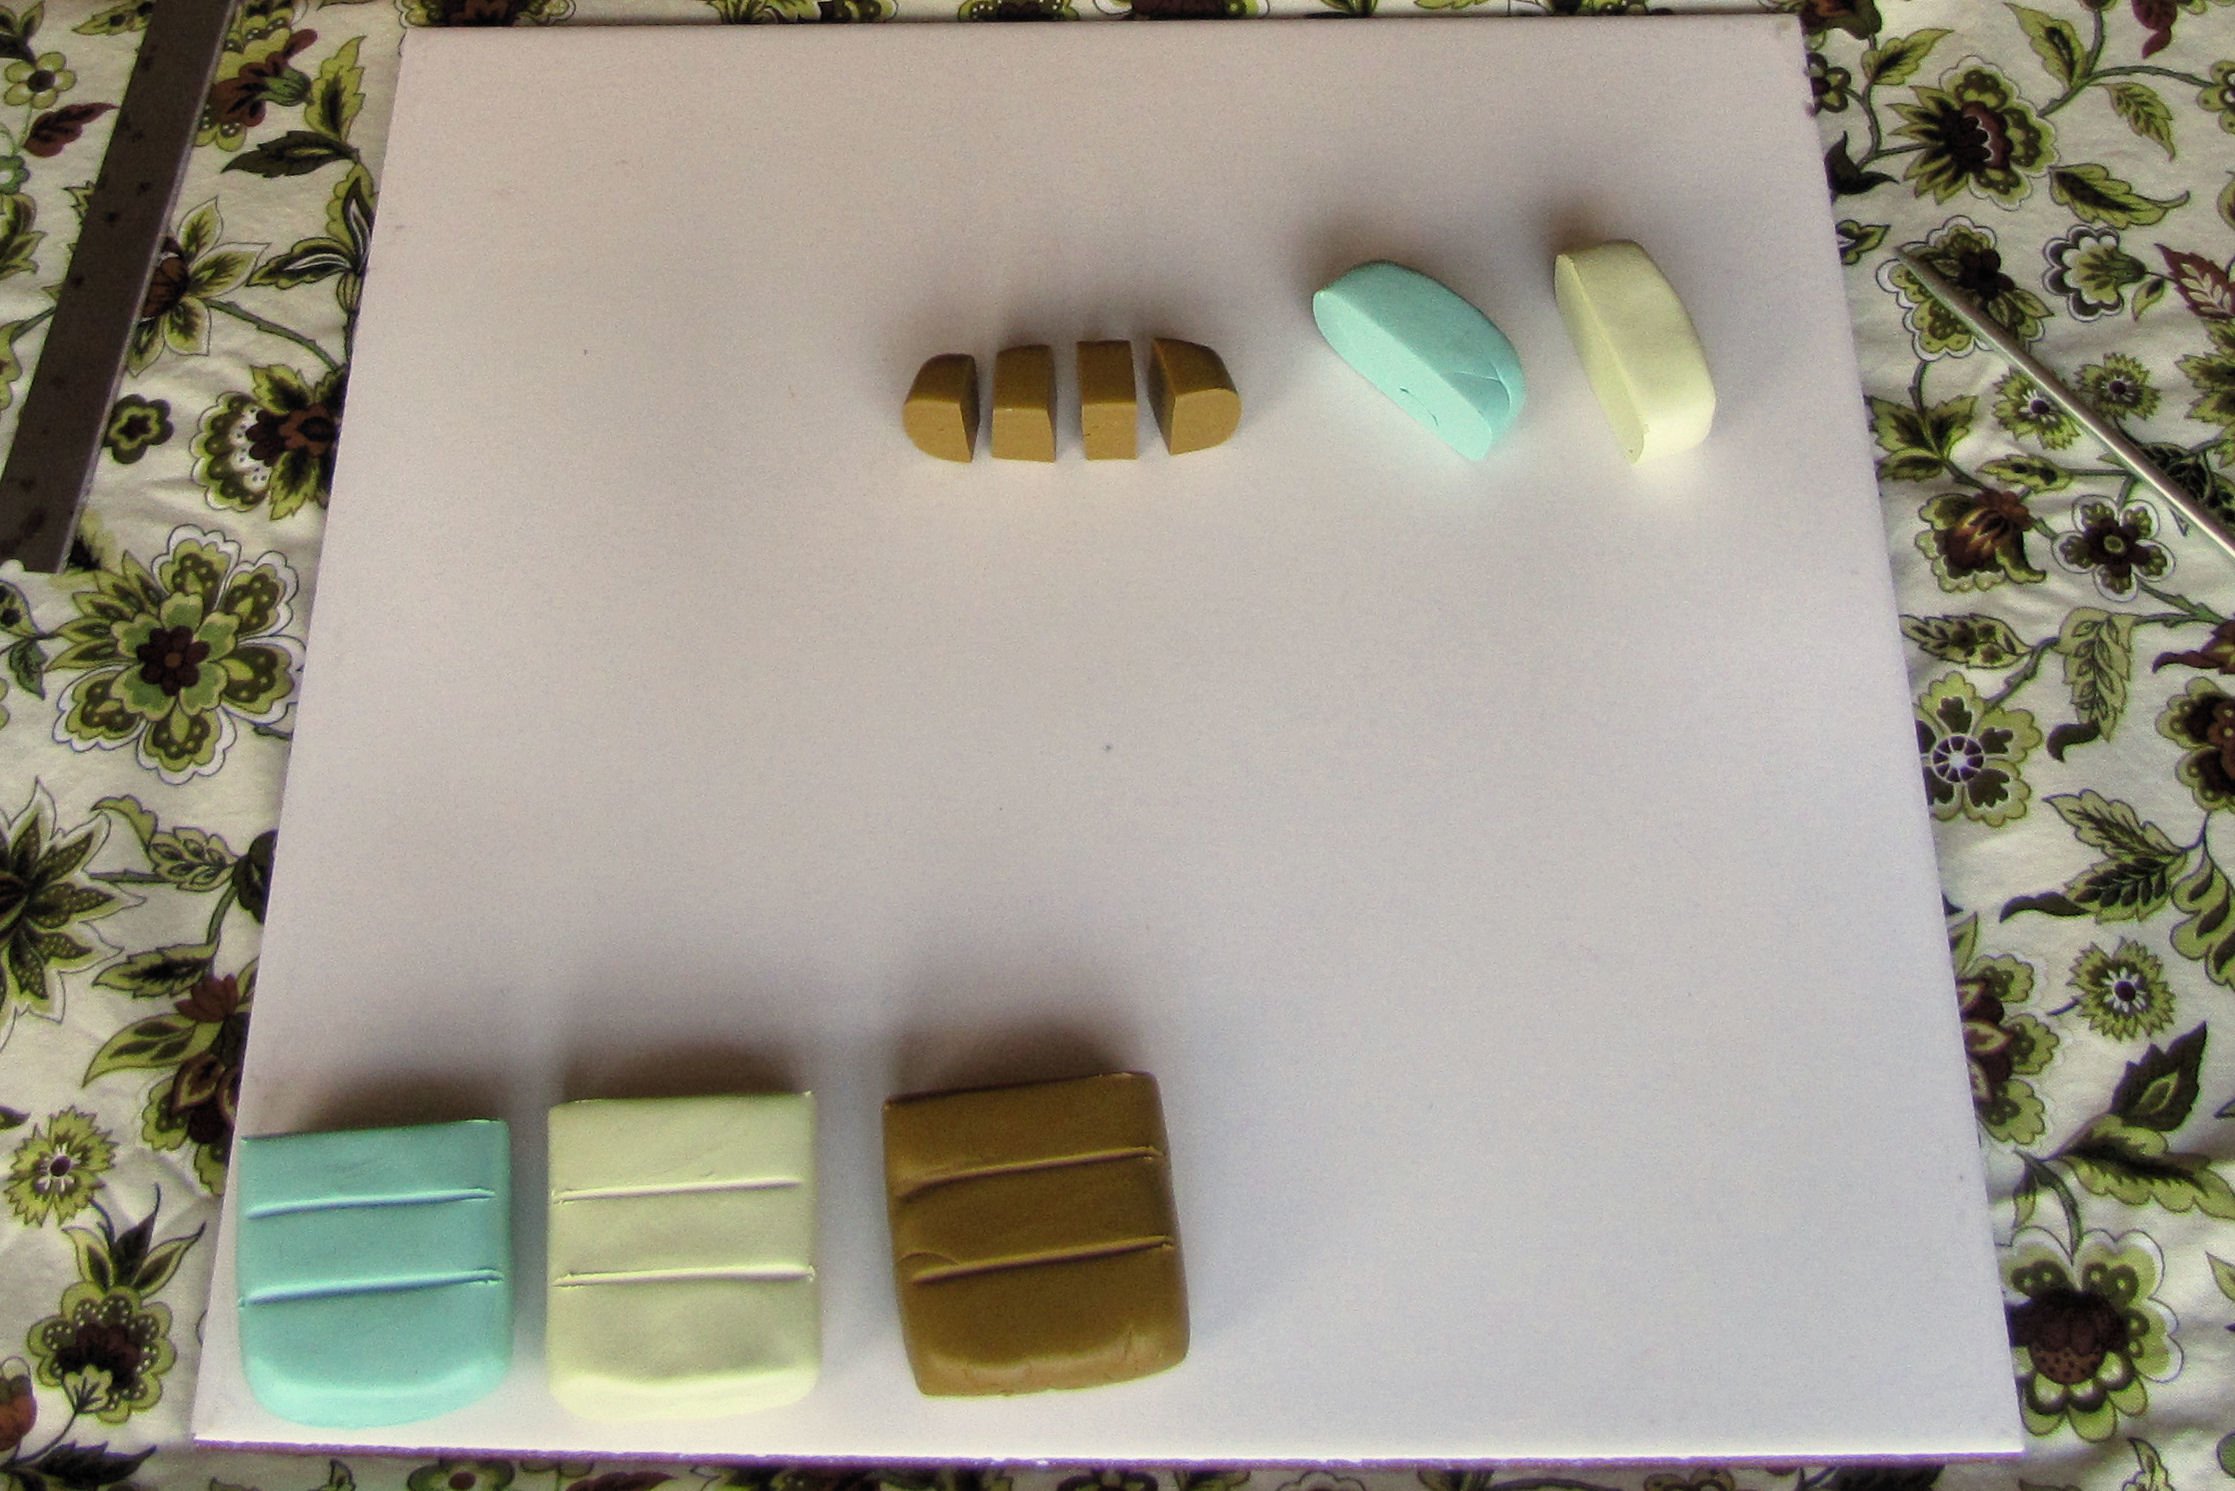
Premo comes in 2-oz blocks that are scored into four sections. Using your clay blade, and being careful to point the very sharp edge down, cut one of the sections off of each block, and set aside the remaining pieces.
Cut each of these three ¼ blocks into four smaller pieces. You should now have twelve pieces. Six of these twelve will become buttons today. The other six, set aside for later.
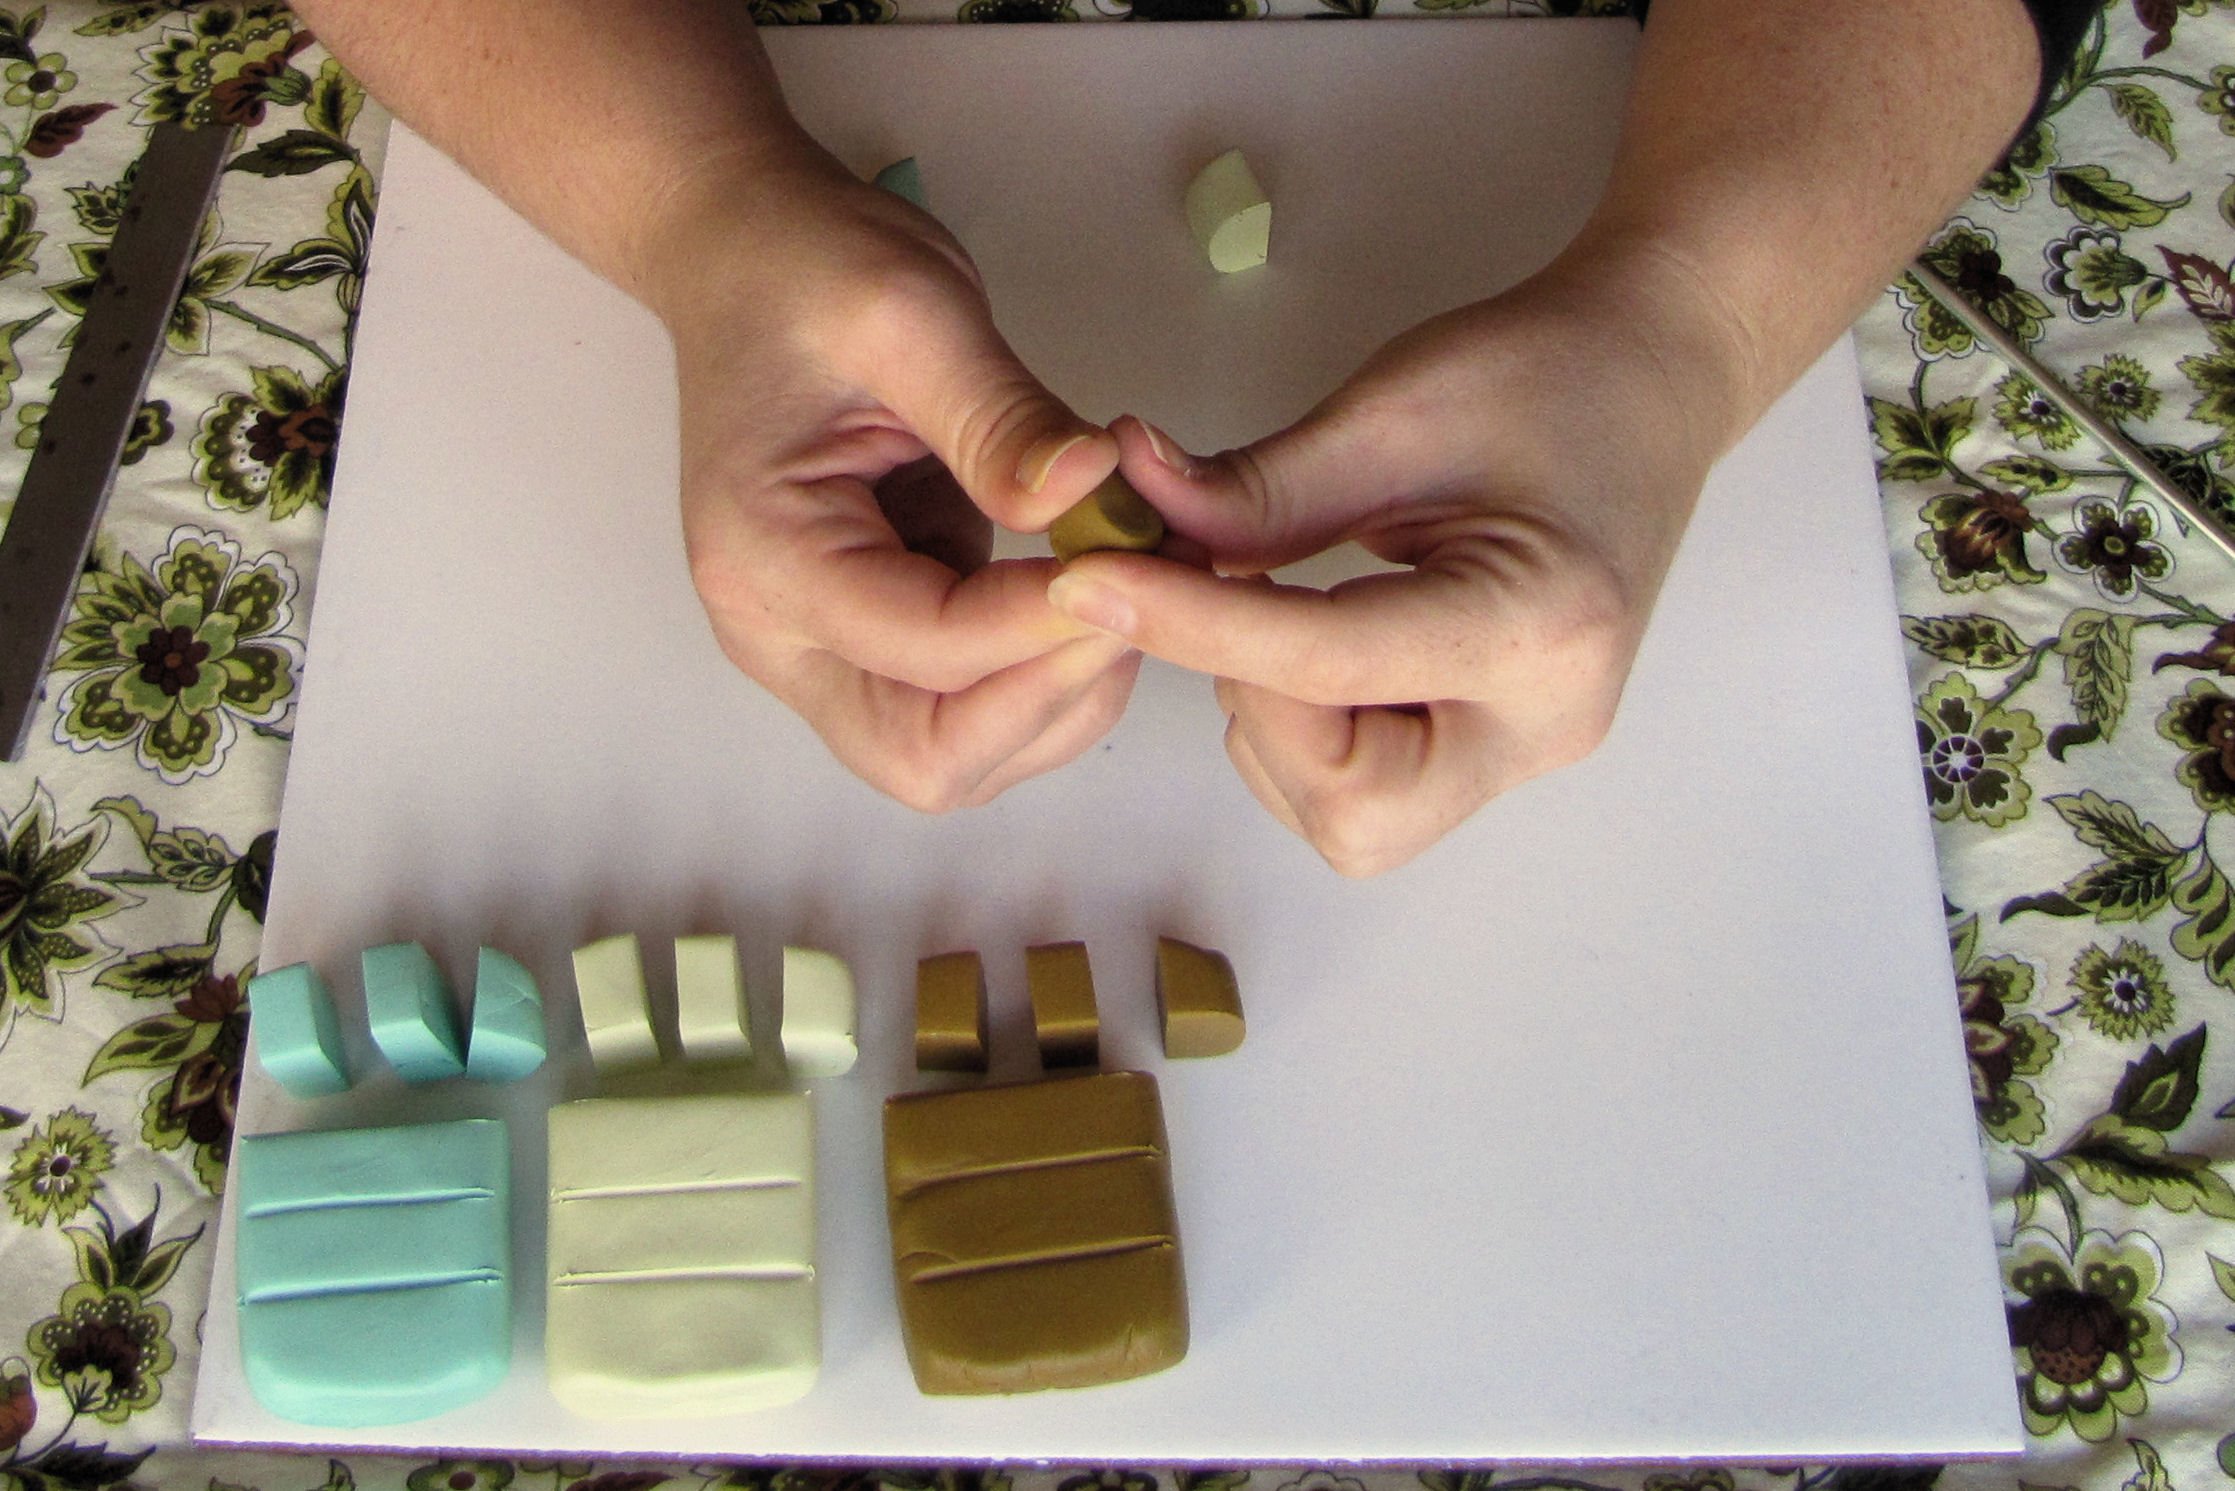
While your clay might feel soft and nice straight out of the package, it still needs to be conditioned. When you condition polymer, you warm it and knead it well between your fingers. Pick up one of your small sections and smoosh it between your fingers. Press it from all angles. Roll it between your palms into a snake. Ball it up and roll it into a smooth sphere. Continue to play with it in this manner until it feels comfortable to work with.
Conditioning clay prepares it for use in any project. It aligns the particles and plasticizers so that they will harden properly later.
Note: Failure to condition the clay may result in a weaker finished product after baking!
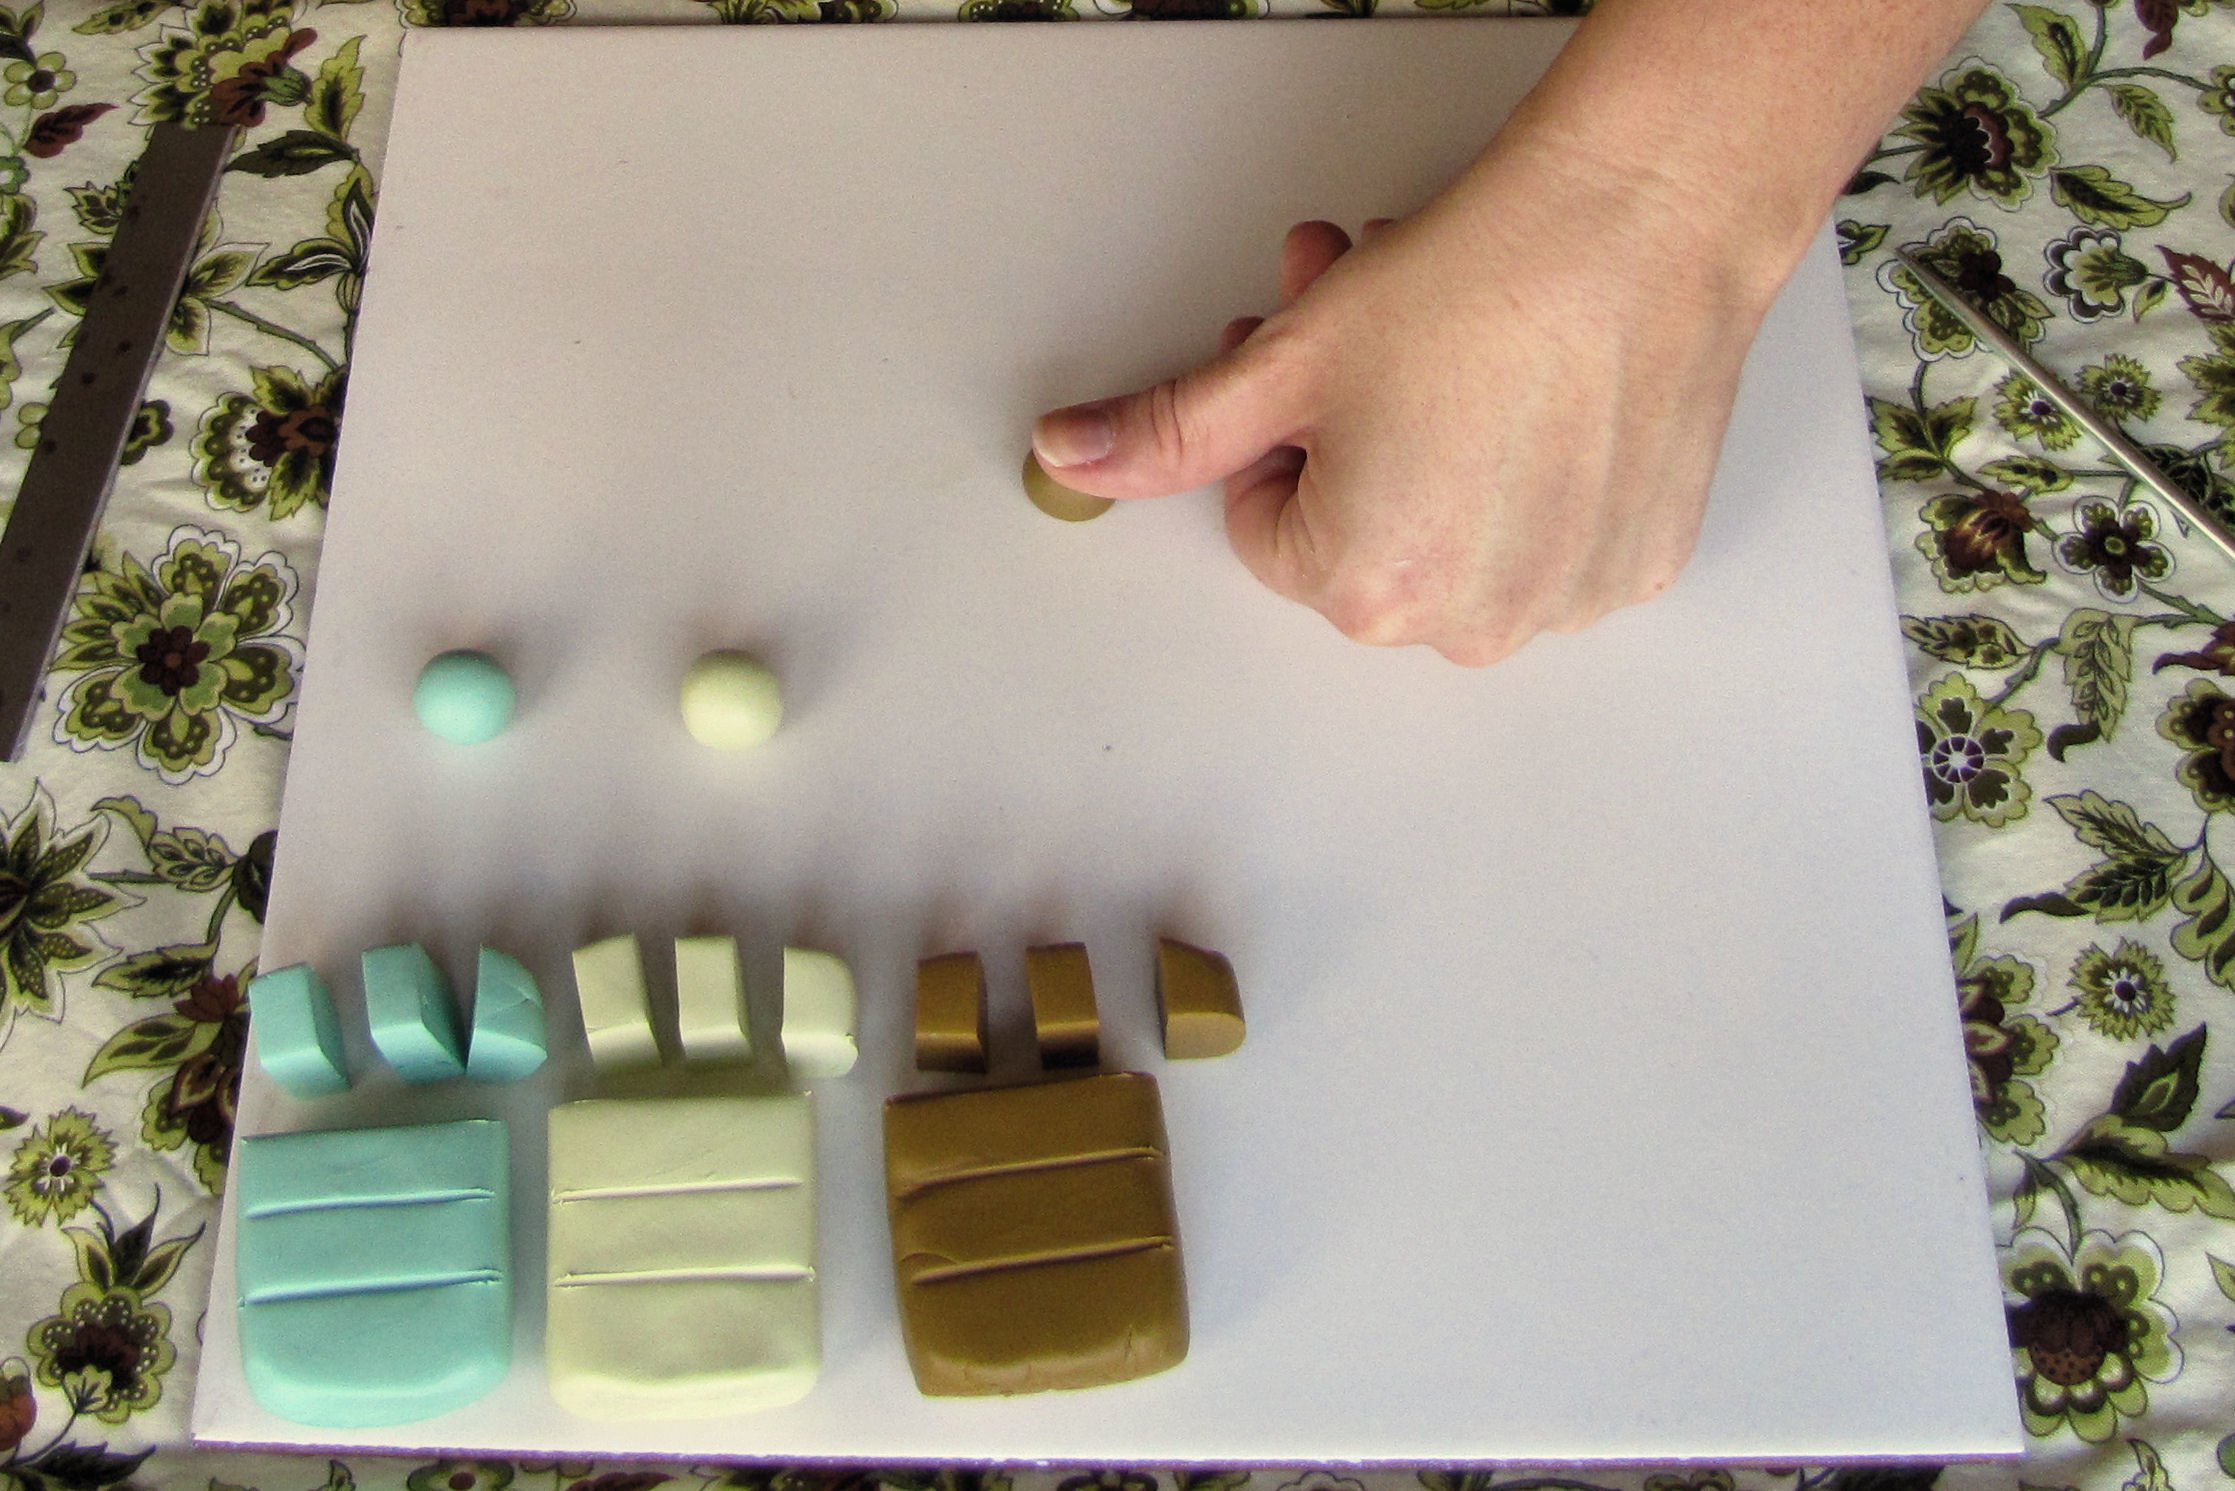
When your clay is conditioned and ready to use, roll it briskly around the perimeters of your palms until you have a nice, smooth ball. It may take some practice to get it perfectly round, but the beauty of working with a solid color is that you can mush it up and start over as often as you like.
Place the ball on your work surface and press down with your thumb, flattening the ball to about 1/4 inch thick. I like for my buttons to be as free of fingerprints as possible. If you also feel this way, you can gently rub the top of the button with your thumb, and ease the thumbprint off. This is fairly easy to do on a solid color button, but becomes more difficult when you begin working with patterns. You’ll need to develop a very soft, gentle touch.
Use the knitting needle to poke two holes in the middle of the button. Be careful to space your holes in such a way that they are far enough from the edge and far enough from each other not to leave too, too thin of a wall around them. The less clay surrounding the holes, the more susceptible to breakage your button will be. Try to avoid any weak points, if possible.
To make sure that the holes go all the way through from front to back, pick up your button from the work surface and re-poke the holes, this time from the back of the button.
If the button is stuck to your work surface, you can try gently nudging it up with your fingers and then smoothing any distorted areas once you have it in your hand, or you can scrape the clay blade under the button, right up against the tile, and slice the button cleanly off of the tile. That is how I generally do it.
Repeat all of the steps, from Conditioning to Hole-Poking for the other five sections, giving you six buttons total.
The last step is to bake the buttons. If you are the patient type, you can wait until the end of the class and bake all of your button types together at once, as I have. If you want your solid buttons now, though, that’s fine, too!
The most important rule for curing your work is to follow the instructions on the package for the brand of polymer you are using. Sometimes companies change their formulas and the baking temperatures right along with it. As of this writing, Premo cures at 275 degrees Fahrenheit, for 30 minutes per 1/4-inch of thickness. Since our buttons are roughly 1/4 inch or less, we should give them 30 minutes. At least.
Here’s a tip: you can bake polymer for a longer time than recommended, but never a higher temperature than recommended. I usually bake my buttons for 45 minutes or so to be safe, and most of my buttons are made in such a way as to require multiple bakings, which means that they are in the oven for well over an hour total. But I never bake higher than 275 because burning polymer causes nasty fumes and requires you to open all of the windows and doors in your house to eradicate it. (Don’t ask me how I know that…)
Note: An oven thermometer would be handy – you should verify that your oven is actually baking at 275 when it says it is, or you could have underbaked buttons. Or nasty fumes.
Periodically discussions pop up in the polymer community about the safety of baking clay in the same oven where you bake your cookies. I don’t know if anything has been resolved to anyone’s satisfaction in this matter, because I stopped paying attention to the entire conversation once I made myself an enclosed baking doohickey. (That’s a technical term.) It consists of two aluminum baking pans, hinged together on one side with wire. In one of the pans I put a ceramic tile with a piece of parchment paper on top. The buttons go on the parchment paper, and the other pan gets flipped over to cover the bottom pan. Voila! Self-enclosed baking doohickey. If there are cooties escaping from my claythings as they bake, they’re not landing on the walls of my oven, but in the aluminum pans.
You can get a similar effect by tenting your clay with aluminum foil, if you feel the need.
Your turn
Time to go make your first set of buttons! If you have any questions, you may leave them in the comments and I’ll do my best to answer them. Once your buttons are done, I hope you will blog about them, or post them to flickr, and leave your link below so we can all see how you did!
Next week
Striped Snail Shell Buttons!
Get the full class eBook
All five lessons, plus other useful tips included in one PDF.











Hi
Nice tutorial! But 275 degrees seems a lot! I suppose You mean 130-150 degrees???
275 degrees is correct in Fahrenheit. I’m guessing you are thinking Celsius? I’ll edit the post so that it is more clear. Thanks!
Ah, You meant Fahrenheit. Silly me. I just struck me when I had klicked submit. Sorry. I´m in Sweden and here we take for granted that it is Celsius. So sorry 🙂
No problem at all! I take Fahrenheit for granted in much the same way 🙂 I’m glad you made me think to clarify what I meant.
Us Canadians use Fahrenheit and/or Celcius because we tend to be confused as to which one is best. We originally used Imperial measurements and then about 25-30 years ago, switched over to Metric. That leaves many of us who learned both systems, flip flopping back and forth between the two. 🙂
Great tutorial Lisa! Your information is perfect and will be very helpful for any beginner wanting to try their hand at polymer clay button making. One tip I give for making the holes, is to use a regular non-polymer button as a template. This helps for centering and having good spacing for the holes. Especially if you want to add four holes to the design.
Great tip! I would definitely use a big button to do that, though, given the “chunkiness” of these 🙂
I love this project and I cant wait to get started! And your baking doohickey is very smart, I have always been a little apprehensive about using my oven. Thanks so much!
My pleasure! Don’t forget to link up and show everybody what you make! 🙂
Love this project, thank you for the tutorial! I’m running out tonight to pick up the supplies and give it a go 🙂
Excellent! Looking forward to seeing how it goes for you!
What a great tutorial. I’ve never worked with polymer clay and you’ve inspired me to give it a try. Do you mind posting a picture of your doo-hickey? I think I understand, but a picture would be fabulous. Thanks so much for posting this!
Sure! The last image in this post – the one of the buttons waiting to be baked – is actually showing the inside of the baking contraption. You can read more about it and see some other photos here.
Thanks so much! I’m not sure I “need” a new hobby, but this looks like so much fun and I love the idea of being able to match my homemade buttons to the clothes I make!
I am totally loving the idea of making my own buttons! thanks for sharing– now, to the store I must go. weeee
Yay! I have to say, mixing colors to match my favorite fabrics is so much fun for me. I hope you enjoy it too!
I can’t wait to try this! Thanks for the tutorial.
Do you think conditioning the clay is something I can do while nursing a baby? I was all like “Oooo, great. Something I can do while nursing!” but then like “Maybe not because of all your warnings about the utensils and the oven.”
Your buttons are truly lovely.
Kari
I was very heavy into polymer while nursing my youngest, and he’s now an astonishingly brilliant nearly-eight-year-old 😀
Polymer clay is rated non-toxic and is acceptable for use as a children’s craft material, so there shouldn’t be anything to worry about. Still, if you have concerns, I recommend baking in a well-ventilated area (bring your toaster oven outside, or use the fan on your oven) and wearing latex gloves while handling the clay. The gloves are actually pretty great because they reduce fingerprints, and make washing your hands much easier, as sometimes the clay can stick to your hands and be hard to get off. I often wear gloves myself, and I especially did when I was pregnant and nursing.
I have chemist and scientist friends who assure me working with polymer is absolutely safe, but I figure if the small precautions are easy enough to do anyway, why not?
Ayer me sentí afortunada al descubrir su web. Y con el tutorial tan didáctico!
Gracias, y felicidades.
carmen
My pleasure! I hope it translates well for you!
thank you so much, lisa, for this tut … i have always wanted to make buttons like yours … this is so exciting … i have a quilt to finish for a dgd (darling granddaughter) and for a ddil (darling daughter-in-law), then i’m going to do it ….
again, thank you for the clarity in your instructions … for me this is awesome ….
darlene
My pleasure! Glad the instructions make sense 🙂
Lisa, could you tell me what the names of the colors are that you are using in this tutorial? I went shopping yesterday and couldn’t find any Premo in light colors… it was all BRIGHT! I have to order online and you know how hard it is to judge colors on the computer!?!?!
Thanks,
Kari
I hate to tell you this, but none of those colors were straight out of the package. I mixed them myself. I didn’t write down what I used, but if I had to guess, I’d say this is what I used:
I’m less confident on the brown than the other two. I’m fairly sure, though, that I bought four colors and just recombined them into three that I liked better.
If you don’t want to mix your own colors, your best bet is to choose one very pale color, one bright, and one dark. That will give you some nice contrast when we start in with patterns.
Thanks Lisa, I feel better knowing you mixed your colors… I’ll see what I can find…
This will be fun!
Kari
[…] is everybody doing with their button-making? Anyone finish a batch yet? Be sure to head back to the lesson and leave your link at the bottom of the page so we can all ooh and ahh properly over your […]
I forgot this was going on DOH…but thanks for the heads up about PREMO…I did notice some sculpy is not that hard…makes since
You’re welcome. A lot of people learn about Sculpey the hard way. I happen to love the stuff, but you have to know when it is appropriate to use, and when you need to rely on a stronger brand.
I am so thankful for this tutorial! Just a few weeks ago I had decided I would learn to make my own buttons because we have such a shortage of them in the town where I live, and voila, your tutorial popped up!
I made my first batch last night, and I have two questions:
1. Should they clay shrink when they bake? When I divided out the suggested size of clay and pressed it to 1/4 inch thickness, my buttons were more like 1 in wide. I assumed they would shrink when baked, but they didn’t.
2. What should they be like when they are finished baking? When I took mine out at first, they didn’t seem done, so I baked them for a total of 53 minutes. They seemed rubbery. But then I thought they probably needed to cool down. Now that they’re cool, they are harder, but they still weren’t what I was expecting. I have worked with earthen clay before – can you describe how they might be different? I was expecting something much harder and more fragile, maybe even a little like glass?
Thanks again!
Hi, Ashley. Glad you liked the tutorial! To answer your questions:
I should mention, if the look of the clay isn’t what you were expecting, it can be made to look more glass-like. I will touch briefly on finishing techniques during the last lesson, but if you would like a more detailed explanation of how to sand and buff your pieces so that they have a beautiful shine, you can find one in my heart pendant tutorial.
Hope this helps!
Hi Lisa
So excited to follow along…I impulsively bought the Scuplty III at the art store and noticed 2 things….my white was easy to work with but the pink and black were dry. Is this a color thing, old product or Sculpty vs Premo?
thanks!
I noticed the same thing – I got the Premo and the white was easy to work with the the brown was a nightmare. Not sure if its the colors, shelf life or what.
Generally-speaking, it’s more to do with the age of the clay and the way it’s been stored, than anything else. Newer Premo is always nice and soft out of the package.
It’s most likely a matter of how old the clay is, and how it was stored at the art store. Sometimes clay can get partially-baked if it’s left somewhere too hot. You can get the absolute freshest and nicest clay by buying it online at places like Polymer Clay Express, because they have a nice high inventory turnover rate.
Just a word of caution – if you are going to continue using Sculpey III instead of Premo, you will need to be particularly careful when poking your holes. You want to leave enough clay around each hole to give it enough strength not to break. Sculpey can be a bit of a disaster, when it comes to thin or protruding parts. They’ll snap right off.
Thank you
lovely to make buttons to enhance my knitwear or felted garments,very generous Lisa
My pleasure! I always think that polymer and felted wool are a very happy match. I hope you discover that as well!
Beginner Button Class – Making and Baking Your First Button http://bit.ly/eV8qcS #free #tutorial
RT @VictorianaQuilt: Beginner Button Class – Making and Baking Your First Button http://bit.ly/eV8qcS #free #tutorial
I never thought of making buttons from polymer clay before, but it seems so simple! And i love the colours you used
Oh, yes, polymer is very well-suited to buttons, and it’s especially great to be able to perfectly match your colors, if you want to 🙂
Thanks for these tutorials! Just bought my first Premo clay today and made my first buttons. So excited. They turned out great!
Will post on flickr, later.
Great! Can’t wait to take a look at them!
[…] have joined the beginner button class over at the Polka Dot Cottage. I’m making my practice buttons as I type. Join the fun and […]
Thank you so much for taking your time to do these tutorials. I can’t wait to try it!!
@planetjune @lclarke522 @madeinlowell Lisa has a nice tutorial on her blog. It starts with this lesson: http://t.co/XSrPv5R
[…] back to the Beginner Button Class! I hope you were able to complete Lesson One without too much trouble. Have you been taking advantage of the gallery at the end of the post? Add […]
Polka Dot Cottage: Beginner Button Class – Making and Baking Your First Button http://t.co/RwxO8exY
Hello Lisa,
thank you for the tute! I made buttons before, but thatnks to you they came out PERFECT!
Please look at them here – http://irishagold.blogspot.com/2012/02/new-makes.html and you can use them here too.
Thanks for making people happy!
~ Iryna
Thank you so much for posting this!! The directions and pictures are so clear and helpful! I look forward to making my own buttons soon.
My pleasure 🙂 I hope you have a lot of luck with it!
I’m making buttons to go on coats for girls that we make dresses for in Dress a Girl Around the World. Can we paint on the clay after its baked? I want to put encouraging words on the buttons.
Yes, absolutely! Sounds like a great project!
[…] Lisa Clarke’s Polka Dot Cottage […]
You mentioned that these are washable. Are there any special directions for washing? Anything I need to do to prepare the buttons to make them washable? Thank you so much for sharing. I made Halloween shaped buttons/charms to day for my grandchildren to string with your directions. The clay I purchased, 2 different brands, were so hard I could harly work with them. I will be squeezing before buying from now on.
No, as long as the buttons are well-made (no pieces that could snap off), they should survive just fine without any special preparation. Enjoy!
[…] Lisa Clarke’s Polka Dot Cottage […]
I would like to try making these in a much smaller size, say 1/8″ to 1/4″ round and quite a bit thinner. They would be used for antique and modern doll reproduction clothing, which would not be played with. Do you think that this would be possible? If so, what temperature would I bake them at and for how long?
Thanking you in advance.
Yes, definitely, provided you use a strong enough clay. Premo! Sculpey is a good choice. Steer clear of Sculpey III for this. The package of clay has baking instructions on it, and they would apply even for such a small item. The temperature is the most important thing to note. You can’t really bake for too long, but you can bake too hot. Give the buttons at least 15 minutes at whatever temperature the package says. I hope this helps!
[…] Lesson 1: Beginner Button Class – Making & Baking Your First Button Find the tutorial here Lesson 2: Beginner Button Class – Striped Snail Shell Buttons Find the tutorial here […]
[…] if the idea of making your own buttons intrigues you, be sure to check them out. In particular, the Beginner Button Class should be of interest to those of you who don’t have any polymer clay experience or […]
[…] e ho finalmente finito le maniche del mio cardigan. ero così lanciata che ho messo mano al fimo e mi sono anche autoprodotta i bottoni….non sono bellissimi […]
[…] 出典www.lisaclarke.net […]
[…] 出典www.lisaclarke.net […]
[…] 出典www.lisaclarke.net […]
[…] 出典www.lisaclarke.net […]
[…] 出典www.lisaclarke.net […]
[…] 出典www.lisaclarke.net […]
[…] 出典: www.lisaclarke.net […]
[…] e ho finalmente finito le maniche del mio cardigan. ero così lanciata che ho messo mano al fimo e mi sono anche autoprodotta i bottoni….non sono bellissimi […]
[…] If you’re starting from scratch, that’s ok! But I strongly recommend you take a look at the first installment of the Beginner Button Class so that you are familiar with some important polymer clay […]