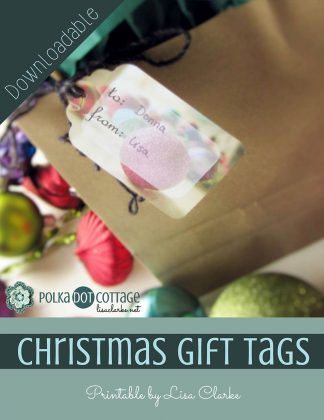
(Told you I’d get more mileage out of these Christmas balls yet…) Ok, so I’ve been super busy this week, but I have a bit of a breather today, and as luck would have it, serendipity gave me something seasonally-appropriate to blog about: gift tags!
See, I ordered this snazzy gift tag punch online last week, and it arrived a few days ago. I had been planning on printing out some of my more festive photos and punching them into tag shapes to be used in my gift-wrapping later this month, when Tracey Clark‘s Picture the Holidays daily prompt arrived, and pushed up my plans a bit.
Turns out today’s prompt is about – you guessed it – making gift tags out of your photos. Well, that’s cool. Tracey provided a tutorial, but I haven’t actually looked at it yet, since I had my own ideas already percolating.
Plus, I was thinking of joining in on Mortal Muses‘ Nine Muses Musing which started today, and their prompt was “giving.” Well, how could I not make tags and wrap my sister’s present right this very minute??
So here’s how I made the tags:
Feel free to play along 🙂
Pull the photos you want to use into your photo-editing software. I used Paint Shop Pro X2.
For each different tag that you want to make, take the following steps:
- Make a new working copy of your image
- Use the CROP tool to give the image dimensions that are some multiple of 4×6, if necessary
- RESIZE the image so that the longest side is 3.5 inches
- Add a Raster layer with 50% opacity and fill it with solid white
- Use the SELECT tool on the “rounded rectangle” setting, to select a box inside the image, leaving a fairly wide border
- Invert the selection
- Making sure you are working on the white-filled raster layer, delete the selected area – you should be left with a rounded translucent box in the middle of the image
- Using the TEXT tool and your favorite font (I like French Script MT) add “to:” and “from:” to the translucent box
- Save the image
TIP: If you are comfortable recording and using scripts, do so the first time you make a tag, so that you won’t have to repeat each step by hand for each image you want to use.
You can get eight tags on one page. If you don’t have two that are naturally vertical, you’ll have to rotate two of your images before printing if you want to get the most out of a sheet of paper.
Print onto matte card stock.
Next you will punch out your tags. While it’s easier to work the punch tool when it is right side up, I found doing it upside-down in this case was a better idea. It allows you to center the image in the best possible way.
Last thing you’ll want to do is punch a small hole in the top of each tag so that you can tie them to your gifts. Or just skip the hole and attach the tags with double-sided tape.
And there you have it!
Not up for all of this photo-editing stuff? You can skip it and just punch your tags out of heavy scrapbooking paper, or use plain card stock and doodle on it with a handful of Sharpies. Maybe have your kids color them.
Or, maybe you’d like to use mine? There’s a suggested donation of 99 cents, but you can choose to pay more, if you like. Or, if you prefer to download them for free, click the link for more details.
By the way, if you don’t want to buy a special tag-shaped punch, you can cut your photo tags out by hand and just leave them rectangular. Or use those scissors that have fancy blades and scalloped edges.












Awesome tutorial! Thanks!!
You’re welcome – let me know if anything is unclear!
Thanks for musing with us! ♥ tam
pretty neat!
RT @lclarke522: Photo Gift Tags: DIY or Download http://bit.ly/f9cqXh
RT @lclarke522: Photo Gift Tags: DIY or Download http://bit.ly/f9cqXh
thanks lisa! this is so sweet of you. 🙂
Thanks for retweeting! RT: @MortalMuses: RT @lclarke522: Photo Gift Tags: DIY or Download http://bit.ly/f9cqXh
you are totally BRILLIANT!!! am i really surprised about that? the thing is — that punch can totally be used for any and every package + your own new seasonal photos. love it.