
First thing’s first: why “tech tips for creative blogs?”
It’s simple. I want to read what you write. I want to know you exist, and I want to have some easy way to keep up with your creative adventures.
But maybe you’re not too comfortable with technology. Maybe you were born too early to have grown up around computers. Maybe someone else set up your blog for you, and you know just enough about it to share your most recent work, but the idea of exploring your blog’s dashboard gives you hives.
It’s ok. That’s why you’ve got me! I’m a crafty blogger, too, so I totally get why you want to put yourself out there. But unlike you, I am kinda fearless about jumping into new technology. I find it fun!
Listen, just by having a blog, you have tentatively dipped your toe into the water. Let me hold your hand and help you wade around a little bit. The simple steps we are going to cover can help you meet new people, build some great online relationships, and get even more satisfaction out of your blogging. We won’t do anything too fancy, and you can keep your swimmies on if you want to, ok?
Building a Reliable Audience
“If you write it, they will come.”
It may have worked for Kevin Costner, but unless you are super lucky, it probably won’t work for you. You may have a delightfully witty voice, and beautiful photos of your work, but unless you provide some mechanism for getting people to your blog, and keeping them there, you’re going to be talking to yourself an awful lot.
There are many simple ways to build a blog audience, and we’re going to talk about them one at a time, in plain English.
Today, we’re going to start with a very simple idea: email notification
Email Notification
The vast majority of your potential readers will have email accounts that they check regularly. Giving Crafty Jane the option to receive your new blog posts in her email inbox is one way to get her to stick around.
Providing email notifications can dramatically increase your readership, but do you know how to add these to your site?
What Service Should You Use?
The short answer is: it depends.
It depends on where your blog lives (Blogger? WordPress?), and it depends on how hands-on you want to be about the whole thing. We’re going to assume that you want to have the least-complicated setup possible, and you don’t want to have to think about it once it’s set up.
Anatomy of a Blog
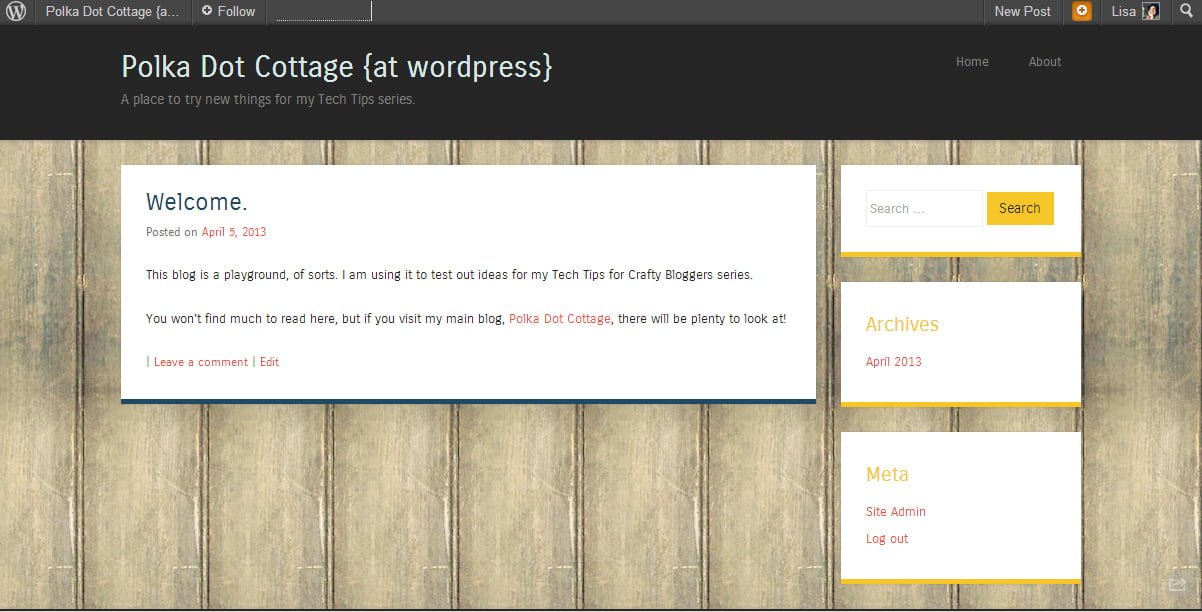
This is a screen shot of my blog (please click on any of the screen shots in this post to see them in closer detail):

You’ll notice that there are three columns: the one on the left is called a “sidebar” and it is meant to house useful things for your readers to explore (information about you, links to your blog’s archives, etc.). The middle column contains your blog’s content, aka the posts you publish. The column on the right is another sidebar, and I use this sidebar for advertising, although you could certainly choose to use it in the same way as the left sidebar, if you wanted to.
Your own blog’s theme may have only one sidebar, or your sidebar may not be on the side at all but instead be at the bottom of everything (in which case, it is more of a footer than a sidebar, but we’re just going to call it a sidebar for consistency).
I’ve created test blogs at both Blogger and WordPress.com that we’ll use to illustrate these concepts, and I’ve made them quite simple, with only one sidebar, and nothing extra to get in the way.
Adding the Follow by Email gadget at Blogger
If your blog is a Blogger blog, then you will want to follow these instructions.

This is my Blogger test blog, and you can see that there is one post in the main content section, and nothing at all in the sidebar on the right. That sidebar is where you will invite your readers to subscribe to your email notifications.

On your blog’s dashboard, find the word “Layout” on the left menu and click it. You will see the various parts of your blog’s theme. On my test blog, there’s the big box where the posts show up, and there are miscellaneous spots that say “add a gadget.” These are the various sidebars and sidbar-like areas.
Click “Add a Gadget” on the right sidebar (or wherever you would like your email subscription box to appear).
Scroll through the list of gadgets until you come to one entitled “Follow By Email.” Click on the plus button to add it to your theme.

This configuration screen will pop up, and you will be given an opportunity to make some changes.
If you want the subscription box on your sidebar to say something other than “Follow by Email” (like, “get our posts in your inbox” or “subscribe via email”) then you can change the “Title” field.
I recommend leaving the FeedBurner URL field alone.
When you are finished making changes, click Save.

Take a look at your blog now, and see your handy subscription box in action. That’s all you need to do. You might want to try subscribing yourself, just to see how it works.
Adding the Follow Blog widget at WordPress.com
If you blog at WordPress.com, these are the instructions you would follow. Be aware that there are two different kind of WordPress. There’s the WordPress.com kind, and there’s the WordPress.org kind that you download and host on your own server. These instructions refer to the WordPress.com variety.
My WordPress.com test blog has a similar setup to the Blogger one. You’ll notice, though, that the sidebar isn’t empty. This is because some WordPress themes fill in the sidebar with default information, if you haven’t chosen any widgets to display.
A widget in WordPress is the same as a gadget in Blogger.
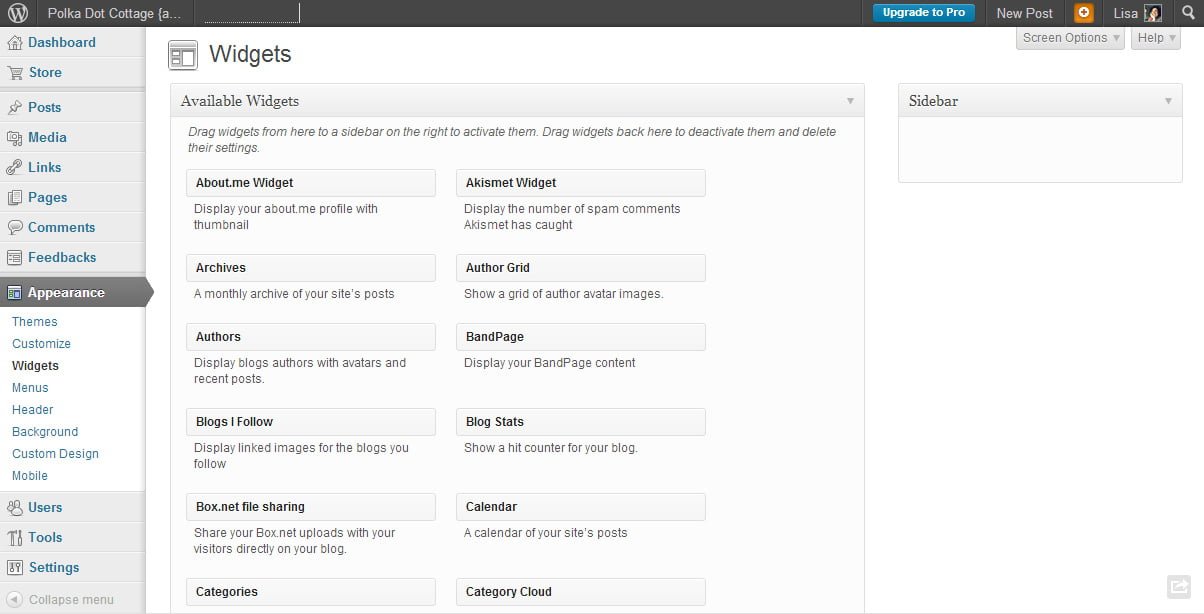
In your WordPress dashboard, use the side menu and click on Appearance, followed by Widgets. You will see a list of available widgets in the middle of the screen, and a list of available sidebars on the right.
Locate the Follow Blog widget, and drag it onto your sidebar.
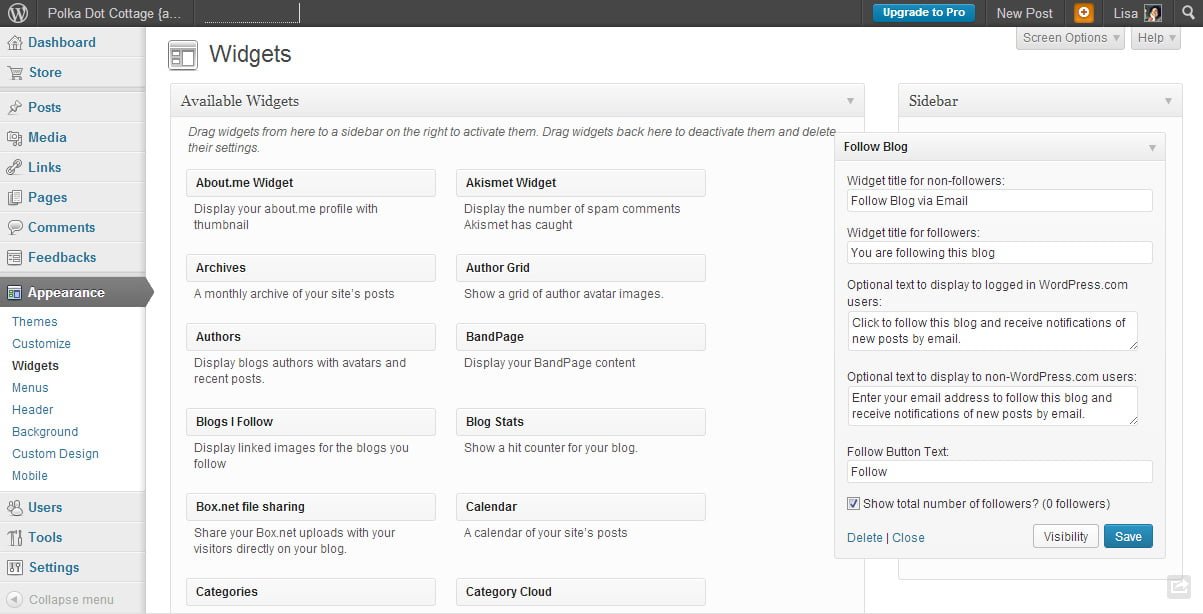
The widget will open up and allow you to make changes to the defaults. You can change any of the options inside this widget to better reflect your own style, and I promise it won’t break anything. When you are finished making changes, click Save.

Here it is, in action. As you can see, the default sidebar stuff all went away once I added a widget. Go ahead and subscribe to your blog. It’s handy to know firsthand how it works for your readers.
Using a plugin on your self-hosted WordPress.org blog
If you have a self-hosted blog, you will need to install a plugin.
I considered showing you a variety of options, but the truth is that there are just so many variables when it comes to self-hosted WordPress blogs, that I wouldn’t be able to do the topic justice. So let me give you a few links to plugins that you can use, and assume that you already know how to install them and set them up.
If you really, really need help beyond that, then I can walk you through the process personally. Contact me, and we’ll discuss it!
Plugins
Feedburner Email Widget – This is essentially the same option you would have if you were running a Blogger blog, however, in this case, you have to sign up for a Feedburner account and set up your feed by yourself. (In the Blogger option, that part was automatically taken care of for you). This plugin adds an email subscription widget to your widget page. Drag the feedburner widget into your sidebar, change any default options you want to change, and save.
Jetpack – Jetpack takes many of the features from WordPress.com, and makes them available on your self-hosted WordPress.org site. The “follow blog” widget is one of those things. You will need a WordPress.com account. Connect the plugin to WordPress.com as instructed. Drag the follow blog widget into your sidebar, change any default options you want to change, and save.
What I use

The majority of my email subscribers are getting my posts through Feedburner, but probably not for long. More and more, I like the idea of relying on as few third-party services as possible. So I’m trying out the Wysija plugin which will allow me to manage my own email list(s). I plan to transition my Feedburner subscribers over to it as soon as I have worked out a few kinks.
You can try out a Polka Dot Cottage email subscription here.
Conclusion
Once you have a reader’s attention, there are many ways to keep it, but one of the most basic ways is through email notifications. Try putting your email widget near the top of your sidebar. You want to make it as easy as possible to find.
I realize I only discussed the most popular blogging platforms out there. If you run another type of blog, and these tips don’t apply to you, leave a comment. I’ll see if I can get you an answer. And like I mentioned before, I’m available to help you one-on-one for a small hourly fee.
Let me know how it goes!
P.S. Next time we’ll talk about using some types of social media to get the word out.
[Please note: the screen shots are current as of April 2013. Software changes and evolves over time, so if these instructions don’t reflect your experience, please do let me know!]


Great article! I won’t subscribe to a blog unless I can get it in my email. I know I’m missing out but it’s easier for me.
Also, regarding email services, I recently moved all of my readers from feedburner to mailchimp. It’s free until you have lots of subscribers – I have a little over 400 subs so it works fine. I love all of the statistics and info I get about my campaigns (blog posts). I can tell which were popular and those that weren’t. If they start charging for those of us with smaller mailing lists, I’d be happy to pay a little.
Thanks for the Mailchimp suggestion. I have heard that before, although I don’t have any personal experience with it.
What an awesome series to do. I am so excited to learn all your tips 🙂
Great! I am looking forward to writing up the next one 🙂
Thanks so much for passing along this information. I am new to blogging and I am looking for all I can do to make mine better! I will definitely be back! I am looking forward to learning all I can!
I’m glad to hear that. There are so many little things that are not strictly necessary, but are good to know if you want to build your audience. Thanks for dropping by and for commenting!
Thank you, Lisa! It’s been on my to-do list for months (years?) to find out how to let people subscribe to my blog by email, but I never found the time to look into it. Thanks to you, Jetpack is now installed and ready to accept new PlanetJune email subscriptions 🙂
Very cool! Jetpack doesn’t like my blog for some reason. I can never get past the “connect to wordpress.com” button. Glad to hear it worked well for you!
Wow – this is exactly what I needed.
I am so glad to hear that! I hope it’s helpful 🙂
Hi Lisa…
Great tips..Thank you..
You are welcome!
Hi Lisa!
I am so glad you are doing this! I’ve been a fan for about a year now..even featured you on my website.
I absolutely LOVE all the changes you’ve made with your blog. I’ve been admiring your ebooks and the Apps for iPad and tablets…just so much awesomeness!
I’m doing a total revamp of CrochetHappy for the 1st Anniversary. Switching to WordPress and self-hosting ..planning lots of changes. Your articles are very helpful for me right now 😀
Love you as always…TracyAnn
Oh, good, I am glad to hear that! I really enjoy tinkering around with this site, so if I can share some of my knowledge, all the better 🙂
Lisa thanks for including me, how sweet! I do need advice in this area not so much cause I don’t have anything. My websites i fininsh hate them then need to rebuild to much of a perfectionist. I know my friends will come back here and say STILL! I am so picky it aweful. Plus busy and finding time. I barely ever get to Google+ and it’ seems better in many ways than FB.
What do you suggest is best? Having both a WordPress blog (on all sites?) and also should have one on a blog service too? What if you have several sites? Do you do just short blurbs on each and an occasionally a long one rotating that? I need this assistance thanks, I added this to my home screen THANKS! Trudy
[…] you already installed Jetpack after our discussion about email notifications, then this will be super easy for you. Jetpack is a plugin that brings some of the special features […]
Hi Lisa!
It’s always great to be able to ask a fellow blogger how to do something especially when I am not tech savvy. I paid (small amount) someone to design or “clean up” the appearance of my blog and I’ve had people ask me about where my “follow by email” option is located or if I have one. I found it at the bottom of my blog and would like to move it to my sidebar. But I can’t drag it over and up. That doesn’t work. Do I click on edit and delete the entire follow by portion and then start over again with a new follow by email gadget on my sidebar? I’m so fearful of losing what I have, I need to ask an expert. Thanks.
Hi, Gail! I looked at your blog, and it looks to me like you have a right sidebar, and a footer. So, you want to take the follow-by-email widget out of the footer and put it at the top of the sidebar, correct?
Go to your Dashboard and click on Layout. From there, look for the widget that says “follow by email” near the bottom of the layout. Put your cursor over it, click on it and keep pressing the button to grab it. Drag it across the screen and up to the top of the sidebar section of the layout. Release the button to let go of it. Press the orange Save Arrangement button at the top of the screen, and that’s it!
I hope this helps 🙂
che bello…intanto posso scrivere in italiano…! leggo molto più volentieri quando un sito è tradotto nella mia lingua. I tuoi suggerimenti poi sono molto molto utili. Potresti dire anche a me se c’è qualche cosa che non va nel mio sito? grazie infinite. Comunque ho ricevuto consigli troppo utili….!
Non avevo pensato di traduzioni! Io uso Google Chrome, che offre automaticamente per tradurre siti web per me. Credo che questo sia un buon punto, così farò una nota di parlarne in un prossimo post. Grazie per il suggerimento!
Ho preso una rapida occhiata al tuo sito web, e una cosa che ho notato è che non si dispone di un modo per seguire il tuo blog via email. Quella sarebbe una volta cambiare vorrei fare 🙂
(Spero che questo ha un senso – ho usato Google Translate.)
—
I hadn’t thought about translations! I use Google Chrome, which automatically offers to translate websites for me. I think that is a good point, so I will make a note to mention it in a future post. Thank you for the suggestion!
I took a quick look at your website, and one thing I notice is that you don’t have a way to follow your blog via email. That would be once change I would make 🙂
(I hope this makes sense – I used Google Translate.)
hai pienamente ragione…tu intendi la mailing list vero?
Do you mean the mailing list right?
Yes. Feedburner and Jetpack both refer to it as “follow by email.” You could also try wysija, if you felt comfortable playing around with the settings yourself.
Ciao Lisa. Ho capito bene? devo mettere la mia news letter? comunque posso dire che il tuo blog è fantastico e si vede che è fatto da una mano esperta! cercherò di seguirti per quello che posso
margherita
Sì, io suggerisco di avere una mailing list per il tuo blog, in modo che le persone possono iscriversi ai tuoi post.
Grazie per il complimento!
Spero che hai capito la mia risposta. Ho usato Google Translate 🙂