


I kept plugging away (which, wasn’t too hard, given the fact that I pulled a muscle in my neck and wasn’t doing much else around the house anyway) and finally cranked-out a pair of fingerless mitts that I am happy with. This was my fourth attempt at making these things on a knitting loom.
My first attempt was really just a warm-up. In the second attempt I tried to get fancy and use multiple types of stitches, but nothing could really save the fact that the yarn was just too thin. It looked terrible. The third attempt was more acceptable, but I put the thumb hole in an awkward place.
In the event that you might like to try these for yourself, here is the basic information about these. I won’t attempt to teach you how to loom knit. For that, I can point you to the book I used, and a nice resource for instructional video clips.
Also, I don’t really “speak” knitting, so if these instructions are not exactly in the proper lingo, maybe someone who knows better can correct me 😀
[edited 12/31/08 – I have rewritten the following instructions to be worked from bottom to top (arm hole to knuckle hole) as opposed to the fingers-first way I originally did it. The reason for this is that I seem to have more control over the tightness of the bind-off row than I do over the tightness of the cast-on row. I don’t like it too loose at the knuckles, and so that’s where I want the relatively tight bind-off row to be.]
Inspirations: A Friend to Knit With and Simple | Green | Frugal Co-Op
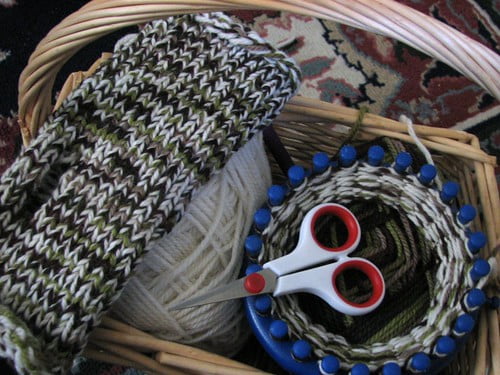
Loom: Blue (24-peg) Knifty Knitter
Yarn: One strand each, knitted together as a single strand, of Patons Classic Wool in Aran and Forest.
Directions:
Cast-on using e-wrap method.
Use the Knit Stitch (Stockinette) for all rows.
Knit 30 rows
To create a thumbhole, knit 1 row, stopping at last peg. Rather than continuing on to knit the first peg, reverse direction, knit the last peg again, and continue around until you reach the first peg. Reverse direction, knitting the first peg again, and continuing to the last peg. Repeat this process until you have 6 total rows knitted in this manner (if your thumbs are small, you may be able to get away with 4, particularly since the hole with stretch with use).
Knit 12 rows
Bind off using basic bind-off method, and weave in long ends with a tapestry needle.
[edited 12/31/08: Since writing the original instructions, I’ve made several more pairs, and have come to realize that I like them a lot better using a single strand of worsted weight yarn. I find that a single-strand produces a much lighter-weight mitten, that hugs my wrists better, and more gently. It comes down to personal preference. If your results are feeling too big or too stiff for you, try again with a single strand. Just be aware, that the loom stretches your work out! You don’t know how the mitt will truly fit until you remove it completely from the loom. What may appear to be working up too big may actually fit just fine off the loom.]
![]()


Those look warm! BTW nice shoes…..where are they from? Kashoan
See what Kashoan has been blogging about: Happy Halloween 2008!
They’re maryjane-style crocs and I got them for Christmas last year. They’re surprisingly comfortable!
Those are great, Lisa! Btw, stockinette stitch like you’ve done will *always* curl. It just does. If you want to try something different to combat the curl, you can do a few rows of garter stitch at each end. Maybe just 4 or 5 rows. Knitting in the round on a loom like you’re doing, you’d do one row of knit, one row purl, next row knit, next purl, etc. Or you could do a knit 1 purl 2 type of “cuff”..?? Just some suggestions. I’ve only knitted with needles and not with a loom, so I’m not sure exactly how you’re operating LOL
Anyway, those look great! I should make me some… hmmm.
That is useful information! I thought it had something to do with the roundness of the loom. I could have driven myself crazy trying to avoid that problem! I actually decided to use a long loom (as opposed to a round one) for the pair that Aidan wants. I did that in the hopes of avoiding the curl. I see that won’t work, but coincidentally, I already decided do his whole glove in a garter stitch, so I’m covered anyway!
Thanks for the tips!
those look yummy…..and very tempting. great, another project!!
See what becky has been blogging about: HAPPY HALLOWEEN
Heh. I’ve decided it is my job to tempt. 😀
Hmmm, you had me up to the thumbhole. LOL
I just finally began working on my looms last week. I bought them about three years ago and never used them…bad habit of mine it would seem. Anyway, I wasn’t aware you could do different stitches, so I will look in to that.
Do you have suggestions for good places to buy inexpensive but good yarn? A couple of years ago I bought some gorgeous yarn to make myself a scarf, but it was $40! Fine for me, not so fine for a four year old that destroys things. Still I’d like to steer away from synthetics, KWIM?
See what Heather has been blogging about:
[…] after my first successful pair of loom-knit fingerless mitts, visions of fingerless Christmas gifts started dancing in my head. […]
on a loom! totally cool.
i think we have one of those around here. i should dig it up!
See what leslie has been blogging about: to lily
[…] hope this has been helpful. To those who have been asking about my fingerless mitt pattern, I have plans to edit that project – I’ve made several mitts since publishing that post, and […]
[…] Loom-knitted fingerless mitts […]
Thanks for the great instructions, my hands and wrists are toasty warm now!
@tkmcquay http://lisaclarke.net/2008/11/01/loom-knitted-fingerless-mitts/
This is such a great pattern. My wrists are so skinny though! Very easy to make. I will probably try to work off of the basic pattern with different stitches and lengths. Thanks so much!
One of the drawbacks of using knitting looms, I think, is that it makes it so hard to adjust the size for a smaller or larger fit. I hope you get it to work for you!
I’m trying it on a smaller loom, so maybe it will fit a little more snug. I’ve been sharing this pattern with a lot of people. 🙂
@tkmcquay http://lisaclarke.net/2008/11/01/loom-knitted-fingerless-mitts/ here it is.
Hi Lisa, thanks so much for posting this pattern. I am not sure (since looking at what year this was posted) if you will see this. I hope so. I am totally new to looming/knitting, etc. I just got my round looms for Christmas and have only made scarfs and hats….and sad to say, only in a basic ewrap stitch. While wanting so badly to make some fingerless gloves to go with my beanie and scarf…I gave it my best shot to try the new knit stitch and this pattern. I got the knit stitch down now…but the ONE finished glove/mitt…doesn’t look so well. I messed up big time. I have 2 thumb holes, haha and they are small. I tried to look up the basic bind off and thought it was like when you ewrap. I am assuming not since it was so difficult/tight to bind off that I finally just pulled the last 4 off their pegs. I am not good at knitting/looming lingo either AT ALL…but gave it my best shot to understand. I am so disappointed in myself cause I don’t have money to go buy more yarn or books…I just google everything.
Maybe with these years past, have you updated your pattern at all? Or maybe can you help me on where I did wrong, if I tried to explain? Thanks so much, I love your gloves and designs.
Hi, Christine. It’s been so long since I wrote that pattern, I would probably write it up differently now that I have more experience.
It’s hard to say what went wrong with the thumbs, but my guess is that on one of the rows where you were supposed to back up and go the other direction, you forgot and did the whole circle. Just a guess.
Your bind-off may be too tight because you are knitting too tightly. When you lay the yarn across the pegs, try to do so more loosely. Another option is that your yarn might be too thick. When I first started, I used some yarn that was so thick, it was really stiff and nearly impossible to work.
If you want more practice but can’t afford more yarn, maybe you should try unraveling one of the gloves that didn’t work, and re-use that yarn. Another option? Buy a wool sweater at a thrift shop and unravel that 🙂
I made a loom knitting video a few months ago. It’s for a neckwarmer, but maybe you can pick up some tips and tricks from it: http://lisaclarke.net/2011/11/02/luxurious-loom-knit-neckwarmer/
Hope some of this is helpful!
hello! i love the hand warmers anyone can adjust the size by dropping a peg!
Thanks for the tip. I would be a little concerned about the distance between pegs with one missing in between, but it’s possible it wouldn’t be noticeable. I’ve never tried it!
I just wanted to tell you that I enjoy your blog. I also cranked out 1 1/2 of these hand warmers tonight. The first one turned out great for my first time. My daughter and husband were amazed. Thanks for sharing!
My pleasure! They do go really fast, don’t they? 🙂
RT @lclarke522: Loom-knitted fingerless mitts http://t.co/6srpe236
Thank you very much! Your instructions inspired my own instructions, which you can view soon on my website (click on mah name!). You don’t need to use them, of course (that isn’t what I’m suggesting). I DID, in fact, give you credit for inspiration! Thanks again! Great tutorial! 🙂
You’re welcome! And thanks for the link back 🙂
hi lisa, its a nice to have that..but i kinda confuse or maybe doesn’t how it goes for the thumb instruction that given. I would appreciate if you could put a video on it. I can easy understand better by watching then to read..Thank you
Thank you for the suggestion. I will keep that in mind!
Ιt’ll permit you find and compare different Goji supplements such as Goji Active, Goji Max – Plus, Goji Select Natural. The question is whether the high nutritional and health benefits of these small red berries make them worth the extra cost. Along with the Goji berries natural weight loss properties, Goji Active also includes a specific natural ingredient to help with this.
My web blog: Ardis
[…] another 7 or so stitches to make it to the lower knuckles. I followed the basic process found at Polka Dot Cottage, but with fewer rows because I’m making this for a smaller hand. I finished it all with a […]