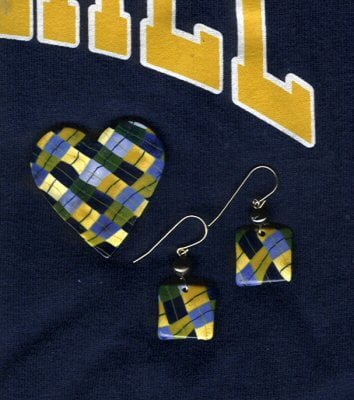
Let’s face it – school colors are useful for distinguishing one football team from another on the field, but they can be a bit garish. If you want to show your school spirit, but in a more subtle way, try this cane. It features your two school colors and every hue in between in a pleasant plaid. Use it to whip up a pair of earrings and wear them with your favorite school t-shirt. Go team!
Supplies


- Polymer clay in your two main school colors, plus an optional accent color. I used Blue and Gold plus white.
- Pasta machine
- Blade
- Brayer or roller (optional)
Step 1


Set up a Skinner Blend with your two main school colors in the center and smaller amounts of the accent color on each side. Or, skip the accent color and do a traditional two-color Skinner Blend. Offset the triangles in such a way that there will be a significant amount of the original solid colors in the resulting blend.
Step 2


Trim the extended tabs from the sheet, and then begin manipulating the sheet with your fingers in order to compress it. It needs to be narrow enough to fit through the pasta machine. Don’t be too picky about this step. Neatness and precision are not all that important here. You just want to press on both ends, moving toward the center until the sheet is the same width as the pasta machine.
Step 3


Run the sheet through the largest setting of the pasta machine in Skinner Blend fashion 10 times or so.
Step 4


There is no need to make the blend completely smooth – it actually adds a little more interest and the illusion of texture to the finished cane when the sheet is not entirely blended.
Step 5


Roll up the sheet so that you can see the full spectrum of colors along the edge of the cane.
Step 6


Compress the cane by rolling it as if to reduce, but instead exert less pressure with your hands and guide the clay inward towards the center instead of outward toward the edges. It may be helpful to also push in on both ends with your palms. Continue compressing until the cane is only 2-3 inches long.
Step 7


Using a brayer, roller, or your hands, convert the round cane into a square one. Flatten one side, turn the cane and flatten another. Repeat until you have 4 flat sides and the cane is square-shaped.
Step 8


Turn the cane on its side and slice down the center, cutting the cane in half lengthwise.
Step 9


Run each of the school colors through a medium setting of the pasta machine. Take one half of the cut cane and set it on one of the solid-colored sheets, cut-side down. Trim around the cane closely so that the sheet is flush with the sides of the cane. Re-assemble the two sides of the cane, carefully joining them up as they were before, with the exception of the new stripe running down the center.
Step 10


Turn the cane 90 degrees and make a second cut down the center
Step 11


Repeat Step 9 using the other colored sheet.
Step 12


You should now have a short, fat, square cane bisected by two stripes in the school colors.
Step 13


Reduce the cane until it is about a foot long.
Step 14


Cut the cane in half, and re-assemble it so that the two colored squares visible on each end are different hues. Pay close attention to the stripes that go down the center and be sure that they connect as if to make a single stripe spanning the two colored squares. Check both ends of the cane for this.
Step 15


Cut the cane in half again and assemble into a square, making sure that like colors are diagonal from each other. All four visible colors will be different, but you should be able to see two lean more towards one main school color and two lean towards the other. If you have trouble determining how the colors should be arranged, try flipping the cane over and looking at it from the other side. These four colors may be different than the ones on the front face, and may be more obvious. Pay attention to the stripes here, too. You want them to connect smoothly through all of the squares.
Step 16


Reduce again, cut into four pieces, and re-assemble. This time, do not change the orientation of any of the pieces when you put them together.
Step 17


Reduce, cut, and re-assemble one last time. Now you have your finished plaid cane!
Variations/Final Thoughts
You can use this cane to show school spirit in all kinds of ways, from pins to pens. What kid wouldn’t want his own unique clay-covered pen in his school colors?


