 This blog post is part of the Fancypants Sew-Along. You can catch up on all of the sew-along posts here. You can learn more about Fancypants or get your copy of the tutorial here.
To be notified when there are new posts in this series, sign up for the Fancypants Sew-Along mailing list:
[wysija_form id=”6″]
Last week, we worked on getting accurate measurements of our bodies. Now that we have those, we can use them to calculate the measurements of our patterns. Through a set of mathematical equations (some pretty simple, some a bit trickier, and one downright hairy-looking) you can turn those body measurements into the necessary dimensions of the pattern, all while taking into account things like ease and seam allowances.
If this all sounds complicated, there is good news:
- I’ve provided a calculator right here that will do all of the math for you
- You don’t really have to know what “ease” and “seam allowance” mean because they’re already part of the formulas used by the calculator.

Whichever way you choose to get your pattern measurements (worksheet or calculator) do it now, and come back here with the results.
What kind of paper should you use?
I currently use a roll of tracing paper that I picked up on Amazon several years ago. Pros: there’s a lot of paper so it lasts a long time, you can fit an entire pattern piece on it. Cons: it’s flimsy (though no flimsier than the tissue paper commercial patterns use).
Before that, I used sheets from one of my sons’ newsprint pads. Pros: it’s heavier than tracing paper and makes for a sturdy pattern. Cons: pattern pieces are often bigger than the sheets of paper, so they need to be taped together.
Other options that I haven’t personally tried: computer paper taped together, rolls of paper from medical examination tables, muslin fabric, cardboard.
You can make your pattern out of any paper (or other material) that can be pinned to the fabric or that can be traced around.
Tips for drawing your pattern
The specifics of drawing the pattern are covered in the PDF, so I won’t repeat the instructions here. Instead, I’ll just share a few tips, which you can choose to apply as you see fit.
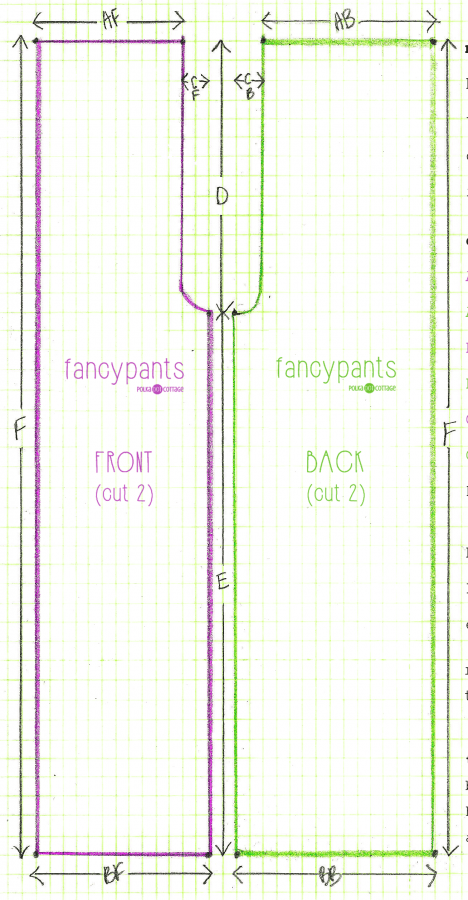
- Refer often to the pattern diagram to make sure that your pattern looks similar to the sample as you are drawing it.
- Use a yard stick not only to measure, but to draw your connecting lines straightly
- Draw your pattern in pencil in case you make a mistake
- Write important information on the pattern, such as the name of the pattern, and whether the piece is for the front or the back.
- Write cutting/sewing instructions directly on the pattern, so that next time you don’t have to have the PDF in front of you to make the pants (i.e., cut 2, sew this seam first, sew this seam 2nd, cut here for shorts, etc.)
When you are finished, you should have two pattern pieces that look very similar to this:
At this point, you are ready to cut out your fabric.
I should mention that the PDF explains the whole process from taking your measurements to sewing the pants. What I am doing with these sew-along posts is just fleshing out the ideas, and going into more detail. The straight how-to’s, though, are all included in the pattern/tutorial itself, and at any time if you feel confident enough to jump ahead and finish your pants, please do!
If you’d like to share images of your progress in social media, use the #fancypantssewalong hashtag!


