

Allow me to introduce the next granny square creation in the series: the mini blanket. It’s really too small to be a blanket, but I’m not sure what else to call it, particularly because I’m not sure where it’s going or how it will be used! So mini blanket it is, for now.
This is the second project I’ve made using my grandmother’s granny squares. (The first was here.)
Project #2: Mini Blanket
For: Me
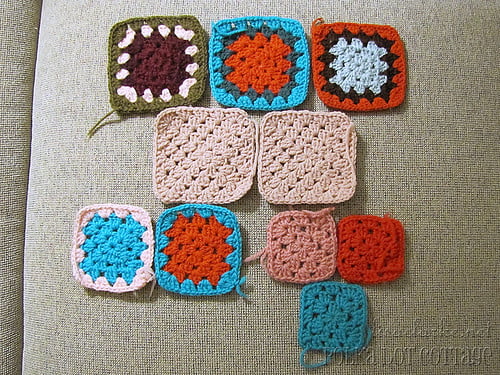
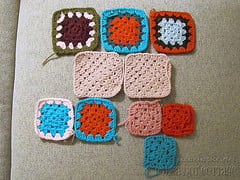
Squares used: 10 (3 five-round three-color, 2 five-round one-color, 2 four-round two-color, 3 three-round one-color)
Step 1: Modify and/or supplement the squares
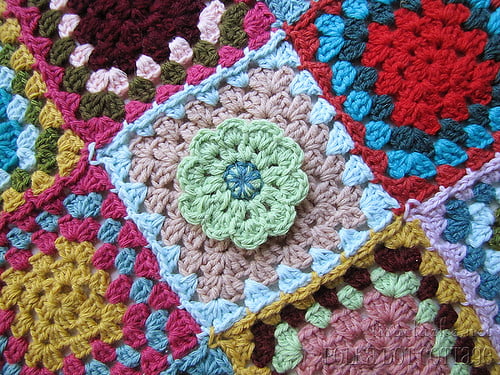
I really like the look of the squares that have three rounds of one color, a fourth round in a new color, and a fifth round in yet another color (like the three in the top row of that photo above). So I selected squares that either fit that pattern or could be added to and made to fit that pattern. I also used a couple of solid color squares. I honestly found the large solids somewhat unappealing, but I knew they could be improved if I embellished them.
I’m a yellow-green and blue-green freak, in case you haven’t guessed, and I knew I wanted there to be more of them in the finished product, so I used those colors in making my modifications to the existing squares.

The modifications consisted of extra crocheted rows on the five bottom squares and some flower embellishments sewn onto on the middle squares.
At this point I had ten squares, all the same size. Ten wasn’t enough to make anything decently-sized, so I made another five squares, and introduced some dark pink and mustard into the mix.

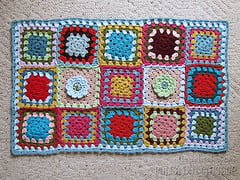
I then had fifteen same-size squares, in lots of the colors I wanted to emphasize.

I arranged them in a 3×5 grid, and distributed the various colors as much as possible. All that remained was to choose a background color to use to connect the squares.
Step 2: Join the squares
This was not as easy as it sounds… all along my plan was to use white to surround the squares. I’ve seen that done nicely in several places (this is a lovely example). But when I outlined the first square in three rows of white, I wasn’t sold. I thought maybe it would look good with a checkerboard of white and aqua or green (or all three), and so I outlined a few more squares in pale colors and joined them to the first. Ew. Not impressed.
I ripped it out and tried again with just two rows of light colors. Not much better.
In my mind, nothing really beat the way the unjoined squares looked next to each other. It took a few days of dithering before I finally decided THAT was the answer – forget white and instead join them in multiple colors – more of the same ones that were already in the squares, and that looked so nice next to each other.

Now, that I liked.
Step 3: Finish and enjoy
It needed a border, and I considered doing some kind of fancy trim, but in the end I went with more of the granny square style. Two rows of it in two different colors.
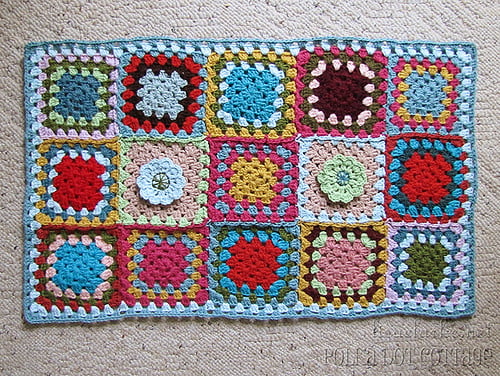
I had weaved in the ends as I went along, so there was none of that to worry about. I just blocked it overnight, and it was finished.
I really like it, and I love how different it is from my first project, despite the original squares being from the same source. The only question now is, what to do with it…
I intended all along for it to go in my bedroom, maybe over an antique trunk we have at the foot of the bed, or thrown over the back of a wing chair we have in there. I chose the colors based on those that will be prominent in the quilt I am making for our bed. But (you knew this was coming, right?) the room is kind of a mess, and the quilt so far is nothing more than a pile of fabrics in a bin in the basement. This little blanket will get lost among the clutter in there, and since I want to enjoy it right this very minute, there needs to be another plan.
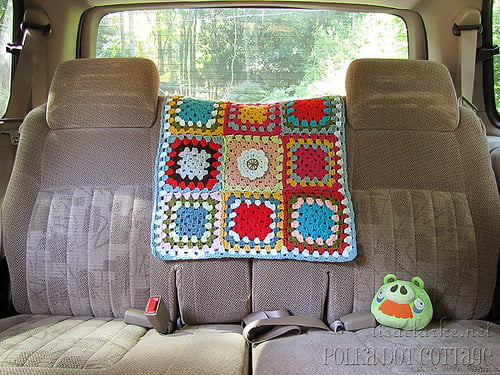
Hmm, yes, this will do. And now I have the urge to sew throw pillows. Don’t you think a pillow or two would look nice on that seat?
Notes/Resources
Project #2, used ten of Granny’s squares (seven of which were modified by me), five of my own squares, and roughly (very roughly) 200 yards of new yarn in various colors.
The original blocks were most likely made from worsted weight acrylic yarn, or some kind of acrylic/wool blend. All of the additional yarn I used was a washable worsted weight acrylic/wool/nylon blend (Berroco Vintage) a washable acrylic/wool blend (Ella Rae Amity) or a superwash merino/wool blend (Nashua Creative Focus).
I used a G (4mm) hook.
I used this set of flickr photos for a new perspective on joining squares. It ended up looking about the same as the method I used last time, but I found it easier to hold the hook this way.
The crocheted flowers were made according to a pattern from Linda Permann’s Crafty Crochet Embellishments class.
Before and after.
Next on the list? I’ve got a pillow for my brother in the works (all finished except for the turning it into a pillow part), I’ve just started my mother’s table runner, and I’ve got ideas floating through my head for my sister and one of my aunts.
So, one of those 🙂


I really like how this turned out! Loving the colors (hint hint). Your flowers were an excellent touch. Nice Job =)
Aw, too bad I used up all of those colors… Just kidding! I’ve got plenty more, and I’ll make sure I work them into your thingamabobber. I bought a few more pinks, too, since I know you like them 🙂
Love this project! RT @lclarke522: Blogging: Project :: Granny Square : Mini Blanket http://bit.ly/qwh9v5
I love it, and aren’t granny squares totally addictive?
And how they make you want to add yet another colour??
The flower embellishments are a great idea, they really elate the solid coloured squares.
My own granny square project started with black and green, and as a way to use up some acrylic yarn I didn’t want to turn into a garment. Now I just had to add two more greens … lol. Wonder what’s next!
They really are! All of my projects for the foreseeable future are going to start with granny squares my grandmother made, but I’m actually really eager to start my own project from scratch after that, using my own favorite colors. I’m really loving the colorful aspect of crochet. I know you can knit colorfully, too, but for some reason I really feel like this lends itself more to it. fun!
Hi! i am a lurker-have been for probably 2 years. i am not a crocheter, but my grandma was! Just wanted you to know that i especially think your mini-blanket is very pretty! Looks great in your van too…
Happy rest of the summer!
Thanks, Andrea! I like it in the van, too. I may just leave it there! Happy Summer to you too 🙂
Hi Lisa, I’ve been really loving all the granny squares. They are so fun. Have you seen this woman’s work w/ crochet:
http://attic24.typepad.com/weblog/ ? I love her wild bright colors.
A few years ago there was something called Babette’s Blanket in Interweave Crochet. I’ve bought that pattern & SOMEDAY will make it. It’s all different sizes of granny squares and is just gorgeous.
I’m wondering, when you do the joining of the squares the way it showed in those photos, does that mean the squares are only joined by one stitch in each empty spot along the side? I’ve always sewed (or crocheted stitch by stitch) the seams. This looks like it would go fast but I wonder if it will hold very well. It looks like it has too few places where it’s joined. Does this make sense? I feel like I’m not describing my question very clearly!
Anyway, I love seeing what you’re doing w/ the squares. Thanks!
Sally
Oh, yes, I stumbled across Attic24 a few weeks ago, and added it right to my feed reader – love it!
Yes, when the squares are joined, there is a single slip stitch in each of the loops. It seems strong enough to me. I have only made decorative items so far, though, so I don’t have firsthand knowledge of how that method would hold up in a blanket. It does feel sufficient to me, and at some point when I do make a blanket, I will probably join them that way. I don’t have the patience for stitch-by-stitch!
Loving the mini blanket. I have crochet envy and lust.
Question. I used to knit fairly well, just basic stitches. How does crochet compare in the learning curve, for you?
WAY easier. Maybe it’s because I already know how to knit? I don’t know… I had tried to learn both in the past and found them both really hard, but this time picking up the hook was surprisingly simple. YouTube and Linda’s online Craftsy class were both very helpful.
Try searching “how to crochet” on YouTube and watching a few videos. It looks really simple when you watch someone else do it – I found that empowering.
[…] with the previous project, I joined the squares this […]
[…] leftover yarn, and I added an extra row to the small square. My sister really liked the look of the mini blanket I made myself, so I tried to use some similar colors in this one, and to add some flower embellishments to the […]
[…] granny square sampler may be destined for that when it’s finished) but for now I just have the mini-blanket I made last year with my grandmother’s squares spread out on the seat for decoration. It’s too small to adequately provide warmth, so we […]