

Sarah forwarded a link to me this morning for a Martha Stewart “Easy Batik” project. I’ve always really loved the look of batik, but have never considered trying it myself – entirely too complicated. But Martha’s project looked very very simple. The only thing I found wrong with it was the fact that it didn’t have the batik “look” that I like. You know, the variegated, layered colors, with the motif appearing in lighter versions of those colors?
I was pretty sure I could get that look by combining Martha’s technique with my own tub-dying one. So I just went for it, and I have to say, I’m quite pleased with the results. Here’s a bit of an overview, in case you’d like to try it yourself. Just keep in mind that I am about as un-fussy as it gets with this kind of thing. When I set up a couple of dye baths in the back yard, I never know what I’m going to get out of them, and that is half the fun!
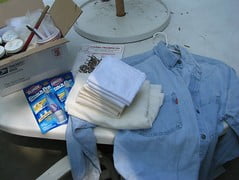
So, we started out with nine plain bandanas, and a couple yards of plain linen I had laying around. We then picked three colors of fiber-reactive dye that I also had laying around:
- Chartreuse
- Blue Violet
- Dark Brown
As it turned out, that pretty much translated into yellow, purple & rust, but that’s ok. Like I said, it’s all part of the fun.
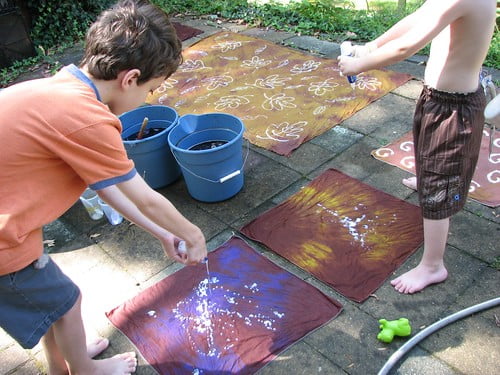
We swirled our fabrics around in the various buckets, sometimes taking them out of one, and dumping them in another at whim. Sometimes, we’d twist them up before putting them in a new bath, so that we’d have bits of both colors showing. We followed the major steps of a traditional tub-dying method, but without worrying about any of the precision, the timing, or whether we were contaminating one bucket with another’s color.
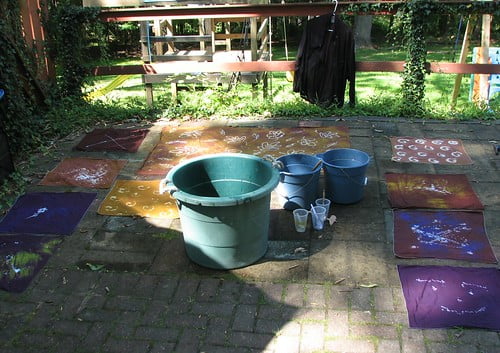
When we were happy with our swirls of color, we (actually, I’m going to stop saying “we” here because, realistically, all the boys did was choose one of the colors, try on some rubber gloves, stir a bucket once or twice, and squirt a bit of bleach here and there. I did the rest while they played Ultraman nearby.) Ok, so when I was happy with how everything looked, I wrung the dye out of the fabrics as best as I could, and laid them out on the ground.
And then, because I’m entirely too impatient to wait for the fabrics to be washed and dryed, I just picked up the bleach pen and started squirting out a few designs while everything was still wet. Looking at my big piece of linen, I saw Fall colors, and decided that the images on it needed to be leaves. I’m not a particularly talented drawer, but I can scribble ok, so I scribbled some oak leaves and a few others to fill in the empty spaces. The boys were much more abstract with their designs.
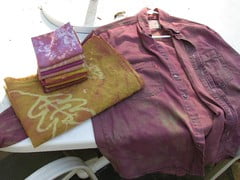
After the bleach did it’s job, I rinsed it off of the fabrics with the hose. A few of the designs, including the linen, I put back in one of the tubs, just to give the motifs I’d drawn a tinge of a different color.
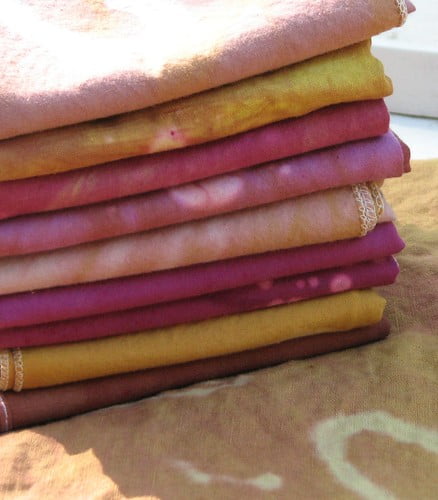
One cycle through the washer & dryer later, I had a nice stack of purple & gold linens to play with. I’m not sure what will become of the bandanas. I’d have made the boys shorts if any of them looked enough like each other to become a pair. I suspect I’ll just set them aside to use as handkerchiefs for Eamonn, who has a strong (read: meltdown-inducing) preference for hankies over tissues.

The linen became a skirt, after supper tonight. I figured if it was going to be somewhat fall-themed, then it should also be longer than my others and supply some extra warmth for those crisp Pumpkin Latte kind of nights. I’m very happy with it, and it’s nice that it doesn’t look like my other 32 handmade skirts.
The potential of this technique has impressed me enough that I have already placed an order for some new dyes and some plain cotton that I can play with. I would like to make something in the aqua/green family (anybody here surprised? No, I thought not.) and I’d like to plan out the design a little more carefully this time instead of just scribbling gigantic leaves all over the place.
Not that there’s anything wrong with gigantic leaves 😀


Extremely great! What fun!
See what Shelley Noble has been blogging about: Macro Obscura and Getting the Real Dirt on Pseudo Soil
is blogging: Unique batik http://tinyurl.com/6rmpge
i love this skirt…looks professionally dyed.
mary
See what mary tempesta has been blogging about: How to get great lighting for your photos
I love it! I love the skirt, I love the process. I’ve tried actual batiking ages ago and swore I’d never do it again, even though I still have the pot of wax just in case. I never thought of using bleach. I’m so excited I’m going to have to try it. and, this morning, before work, I managed some time for one of those scrap bracelets you talked about. And, your buttons are fab. Ok, thats enough gushing. Thanks for posting great stuff!
See what Ashleigh has been blogging about: Last night…
Heh, gush away. I don’t mind 🙂
I don’t think I’d have the patience for traditional batik, but this was just my speed – I did this in a few hours, including the time it took to sew the skirt!
M’dear…you are truly crafty to the core. 🙂 All the new fabric looks wonderful, but that leafy skirt is FABULOUS! 😀 I can picture it with some brown heel boots in cooler weather, oh, and a nice comfy sweater. Yum!
See what Christie has been blogging about: Thinking baby
Ooh, that does sound nice. I have some thrift store boots that would be perfect! Not to wish the rest of the summer away or anything, but I really enjoy sweater weather…
I really like your skirt, cute idea I will have to try this. Alot easier than the wax technique. Thanks for the tutorial.
See what Chris Warner has been blogging about: Getting Things Done
Wow! I love the idea of dying fabrics. It looks like so much fun! I love your fall themed skirt. I can’t wait for fall and Pumpkin Lattes!!!
Have a good day!
See what Nicole Wermers has been blogging about: New Creations
Looks great! wow-i love the skirt, but I am also partial to the purple bleach squirty ones too.
What a fun project.
See what Molly has been blogging about: Technorati
wow that skirt is GORGEOUS! You are just a wealth of creative talent, aren’t you 🙂
See what Jen has been blogging about: A new lifejacket
Your batiks all turned out beautiful! I am so impressed. And that skirt looks great. I love fall colors!
See what Teresa has been blogging about: Sending One To You
I love the results of the dyeing projects you do! I do have a question though- have you ever dyed something that was a cotton blended with something else, like spandex or nylon? If so, do these dyes you like to use work ok?
I once dyed a bucket hat that wasn’t cotton – not sure what it was, actually. The dye took, but the color was not as vibrant, and it took on a bit of a grayer hue. THe company I get the dyes from has some information on dying different fabrics here that might help.
You know, now that I think about it, I’m pretty sure the shirts I scrunch dyed have some spandex content, and they came out very vibrant.
That looked like a lot of fun! I love that skirt, too!
See what Laura has been blogging about: Vibrant necklace – karmabeads
That skirt looks amazing. Now i am going to have to try dying fabric. I’ll blame you when DH complains 🙂
See what Kim has been blogging about: Finished Quilt & Garden Party
Love that skirt! It looks so cute on you. I’m definitely going to try this.
See what NesieJean has been blogging about: School Days again – darn it!
What a cool way to do batik! I’ve done the wax thing, but your way looks a lot easier! Thanks for letting us know about it.
[…] Fabric transformed Image by lisaclarke Eight plain bandanas, given a faux batik treatment and turned purple & gold. Blogged here. […]
YOU are just amazing! How I love all of your winsome words and every tutorial is simple enough for the people like me who are scared off by an actual ‘pattern’…so I can handle these simple and basic instructions thanks to your insight. I will have to get them all printed up and keep them in a handy binder as a reference guide. I feel so excited to have found you, thank you Lisa Clarke for your expertise and down-to-earth attitude. I am having so much fun with your website and Etsy pages!
Aw, and YOU are sweet! 🙂 Thank you for taking the time to let me know how much you are enjoying my website!I’m a big fan of the “plain English” approach to craft instructions. And in some of my blog posts (like this one, actually) I was experimenting as I went along. I think when you wing-it as often as I do, it’s easier to keep the instructions simple than it is to write an actual pattern!