

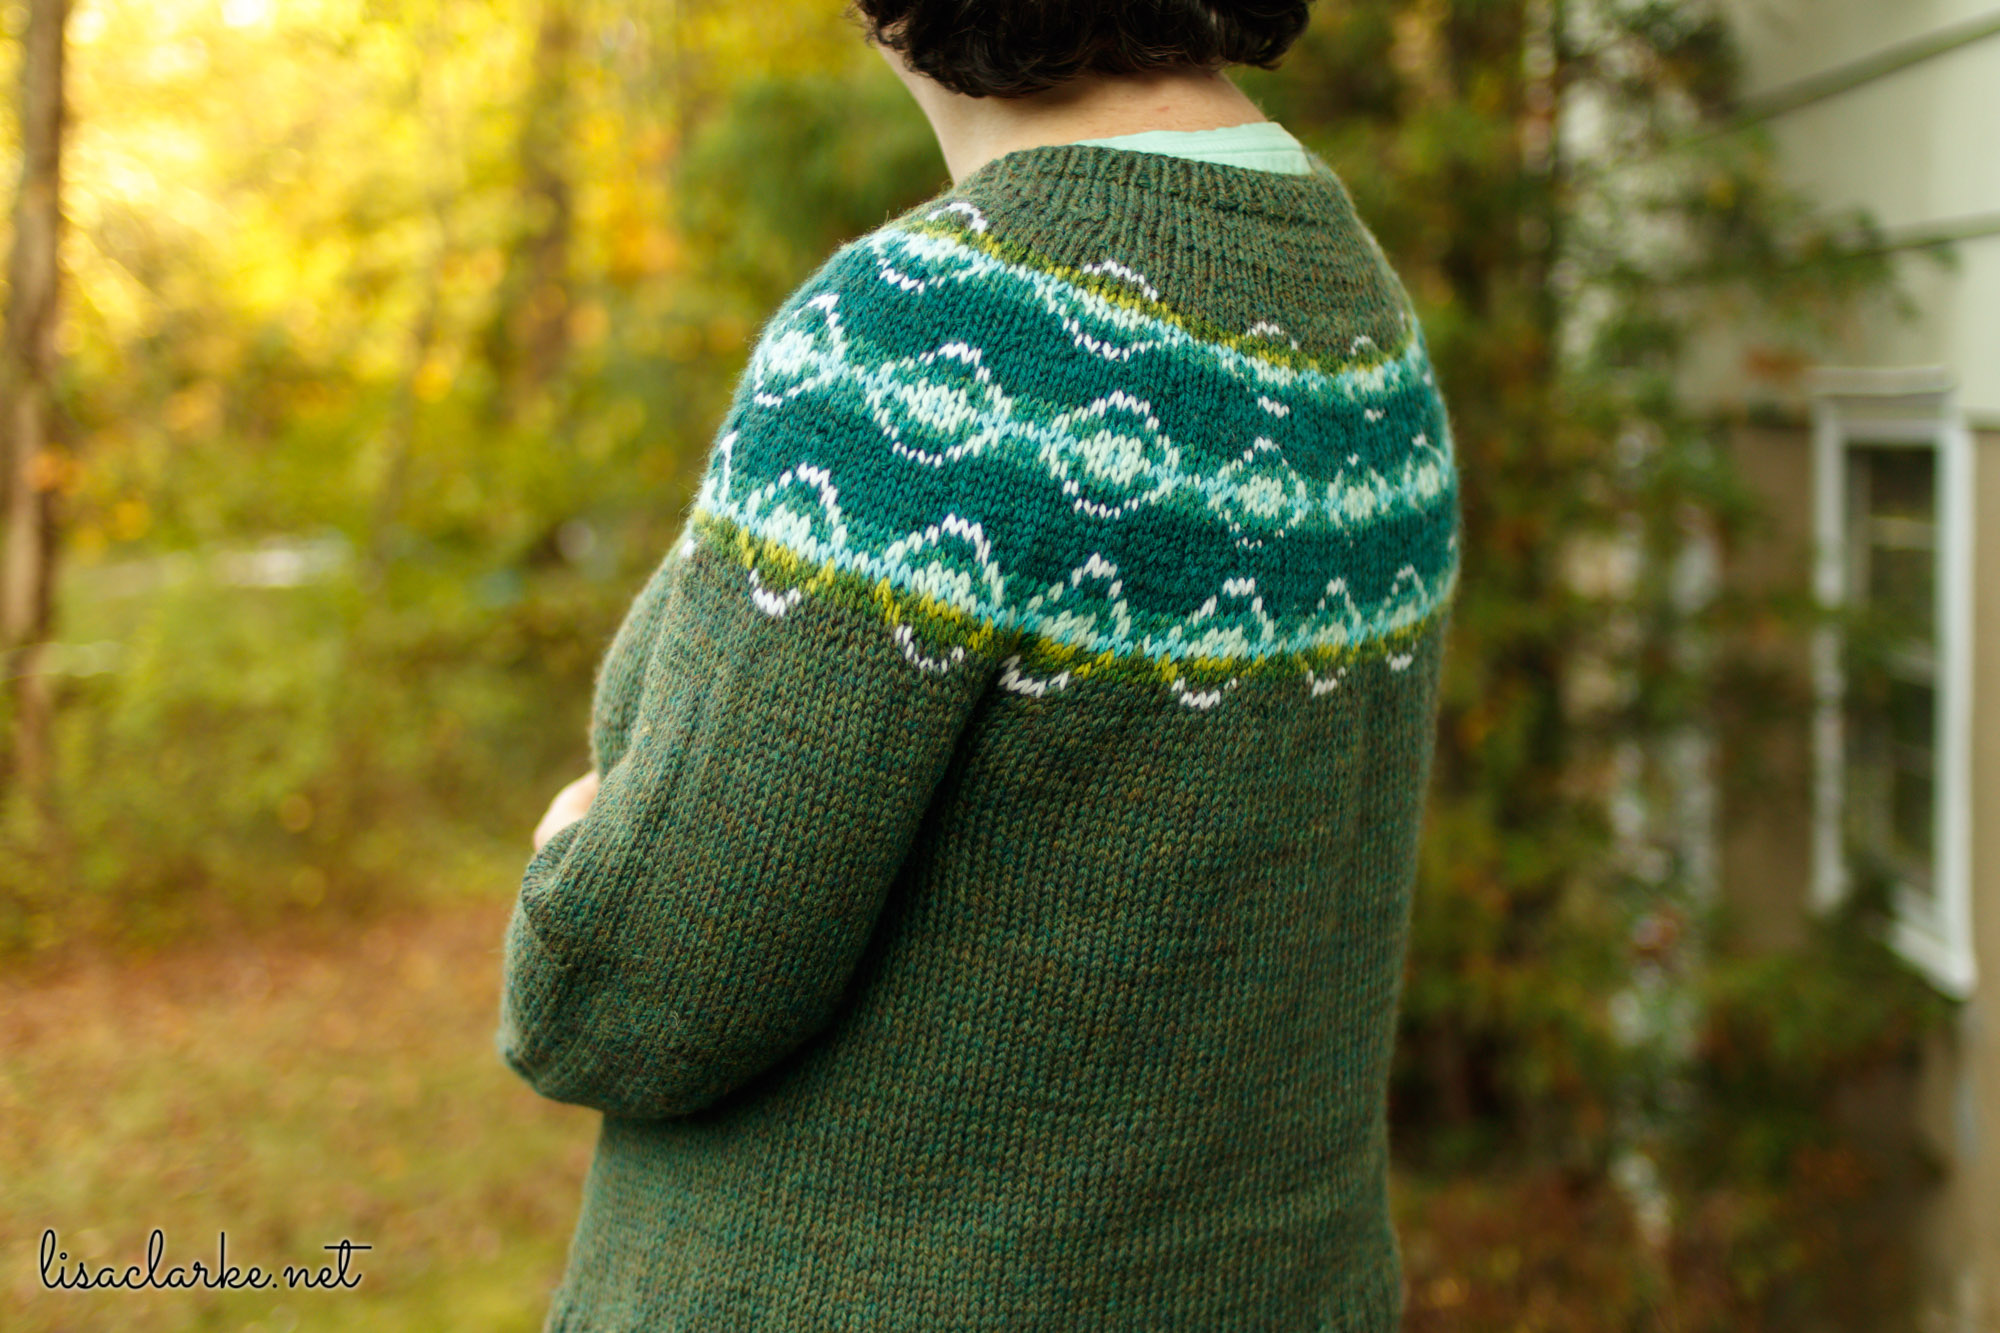
Hi there. Allow me to introduce my latest sweater: the Vernal Pool Pullover. So named because it was spring when I was working on it, and the neighborhood was ringing with the sounds of mating frogs.
I’m going to show you how this sweater evolved from the Porthole Pullover, how I replaced the Porthole yoke with the Vernal Pool yoke, and how you can do the same, or similar.


I started this post at the end of April. April! It is now August for those of you keeping count. (Edit: it’s October.) I’ve lit a fire under myself because it’s getting to be time to think about the September Sweater, which, as you may know, is a grand tradition around here. I’ve been doing it since 2011, and you can see all of the various iterations through this link.
Here’s the thing, though. This year, I’m foregoing the tradition. Instead, I’m making a September Shawl, and it is in part because of this Vernal Pool Sweater you see. I haven’t had a chance to really wear this thing all that much. It’s going to still feel plenty new to me when the weather turns cool again. As such, I have no real wish for a new sweater right now, so I’m switching things up and knitting a shawl. I’ll tell you more about that when it’s done. (Edit: Already finished. Because, like I said, it’s October.)
This Vernal Pool design went through a few different iterations before I made it work. I wanted to share the successful part of my process with you, because it’s pretty handy to know how to replace one yoke design with another.
I started with my Porthole Pullover pattern, which has a fairly distinctive yoke design, and I essentially dropped in a whole other design between rounds 14 and 50. I’m going to explain how I did it, for those of you who have a copy of this pattern and would also like to experiment with other yoke designs.
The beauty of this process is that there is very little guesswork as to whether you’re going to like the fit of the finished product. Unless your gauge varies wildly from one project to another, you’re going to get the same fit with this one as you got the first time you knit the pattern.
Choosing a Design

In order to choose an acceptable repeating pattern for the new yoke, you’ll have to do a little bit of math. Don’t panic. It’s not that hard 🙂
You’re going to want to come up with a motif for your yoke, and it’s going to have to fit within a certain number of stitches across and rows down.
Stitches Across
This number will vary, depending on the size sweater you are knitting. For the following sizes:
30 (34, 38, 42, 46, 50, 54, 58, 62)”
Your motif will need to be this many stitches across:
40 (44, 48, 52, 60, 68, 72, 80, 84)
If that seems like a lot of stitches for one motif, you could also use a number that divides evenly into your number. So for instance, I’m knitting a size 38. I can have a motif that’s 48 stitches across, but I chose to do one that was 12 stitches across, because 12 divides evenly into 48.
Now, when I say “motif” I just mean a repeating stitch pattern. Your chosen motif can include colorwork like mine, or it can be an interesting texture. Its entirely up to you. The only requirement is that the motif fit in the necessary number of stitches and rounds.
Rows Down
This brings us to the length of the motif, and we all have the same number here. It’s 12. The yoke consists of 36 rounds: 3 bands of 12 rounds, each one ending with an increase round. You can use the full 12 rounds for your motif and incorporate the increase into it like I did with the original Porthole Pullover pattern, or you can use only some of the 12 rounds for your design, setting aside at least one solid stockinette round for your increases like I did with the Vernal Pool Sweater. It’s your choice.
I made the colorwork of my motif take up 9 rounds, so that I could have a solid-color stockinette round for the increase, with another solid stockinette round above, and another below.
I used a pixel art app on my tablet to come up with a repeating colorwork design of my own, but you could peruse any number of books or online sources to find one you like. As long as it is the required number of stitches and the required number of rows, it will work.
Examples
You can replace the yoke with any kind of stitch pattern you like, provided it’s the correct size. So, if you want to do ribbing, or a solid stockinette stripe of a contrasting color, those are both fine.
Here are a few ideas for replacing the yoke in the Porthole Pullover pattern:
Vernal Pool

 Each motif is 12 stitches and 12 rounds. The first round and the last two rounds of each motif are solid-color stockinette, while the other nine involve Fair Isle colorwork.
The first motif is repeated across the first band, and the last round of the motif is the increase round.
The second motif is repeated across the second band, and the last round of the motif is the increase round.
The third motif is repeated across the third band, and the last round of the motif is the increase round.
All three motifs are the same, except for a few of the colors. This is how we get the effect of the yoke fading from olive green to teal and back to olive again.
Also, you’ll notice that even though the motifs for the three bands are not offset from each other in any way, they still don’t end up stacked directly on top of one another when they are knit. This is because of the increase rounds that are done in between each section of colorwork.
Tiny Fair Isle

 The first band is plain stockinette in the background color of the sweater.
The second band is 3 rounds of that same stockinette, a 6-round Fair Isle motif, and 3 more rounds of background-color stockinette.
The third band is plain stockinette in the background color of the sweater.
Color Block

 This is a 3-color design. The sweater before the yoke is in color 1, the yoke is simply plain stockinette in color 2, and the body of the sweater after the yoke is color 3.
Texture

 Replace the entire yoke section with three bands of some kind of textured stitch, making each band 11 rounds, with the increase round being plain stockinette.
Any Questions?
And there you have it. Now you should be able to take your trusty Porthole Pullover pattern and replace the slip-stitch colorwork yoke with any other design you like!
I hope that my explanation of the process was clear enough, but if it wasn’t, please leave a comment and I will try to clarify what I mean.
I am considering writing up the Vernal Pool Sweater as its own pattern, but don’t quote me on that. It took me six months to finish this tutorial! Pattern publication is a whole other beast… Still, do let me know if you’d be interested in buying a copy of that pattern, because knowing there is interest might be what it takes to get me moving on it!
Also? I’m suddenly in the mood to knit another sweater…
P.S. Don’t have the Porthole Pullover pattern? Get a copy here.


It looks very pretty I love the pattern.
Thank you, Shirley! I’m so happy with the way it came out 🙂