

Another project down, three more to go! I’m trying very much not to lose steam on these, because if I know anything about myself at all, it’s that I will let a project gather dust for years if I set it aside for too long. Still, I hear that Tea Leaves Cardigan calling my name, and I am pretty sure I am going to heed the call very very soon, wherever I happen to be in those last three granny square projects.
(So, dear aunts and cousin, you read it here first. If you don’t receive your goodies within the next few months, you may not see them until roughly 2015. Just so you know.)
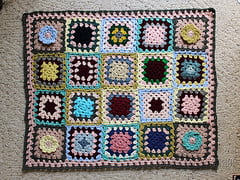
My sister, on the other hand, need not worry. Her project is all finished and folded up nicely next to my front door, waiting for me to get a chance to drive it over to her. Here is a peek:

(It wasn’t quite finished in that image – no border – but I was enjoying having it around the house anyway.)
Project #5: Small Throw
For: My sister
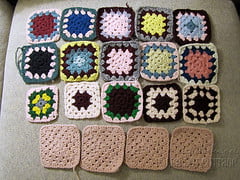
Squares used: 19 (11 five-round three-color, 3 five-round two-color, 4 five-round one-color, 1 four-round four-color)
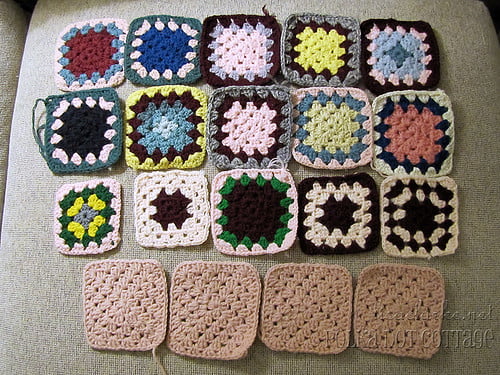
Step 1: Modify and/or supplement the squares
She wanted a 4×5 throw, which means twenty squares.

I had nineteen. And one of them was too small.

I added one more square, which I made from our grandmother’s leftover yarn, and I added an extra row to the small square. My sister really liked the look of the mini blanket I made myself, so I tried to use some similar colors in this one, and to add some flower embellishments to the plain squares. Unlike my own flower embellishments, I made the centers of the flowers pink, to help tie them in with all of the other pink in the various squares.
Now I had twenty squares, all the same size, ready to be joined together.
Step 2: Join the squares
My sister has been into pink and black for as long as I can remember, so I already knew that I wanted to outline the entire throw in pink and a very dark gray, but I still had the whole middle to contend with first. I decided to outline the corners in the dark gray, and then use the four flower colors for the rest of the outlines.

I wanted a random look, which contrary to what your intuition may tell you, usually requires colored pens and a handful of precise diagrams to achieve. This was no exception.
If I had it to do over again, there are a few outline colors I would switch around, but I’m not going to be overly picky. It is supposed to be “random” after all.
Step 3: Finish and enjoy
The pink in this project was important, so in order to bring it out, I did a double row of pink around the border.

And, because I tend to think a darker color around the outside of a piece gives it a nice “outlined” look, I finished it off with a single row of the dark gray. The ends were already woven in, so I just blocked it overnight, and it was finished.
I like this one. I’ve enjoyed slinging it over the side of the couch while I worked on it – it looked nice there, and the colors appealed to me. My sister may have to fight me for it…

Don’t you think it looks right at home on my favorite chair?
Notes/Resources
Project #5, used nineteen of Granny’s squares (five of which were modified by me), one of my own squares made from Granny’s yarn, and roughly 300 yards of new yarn in various colors.
The original blocks were most likely made from worsted weight acrylic yarn, or some kind of acrylic/wool blend. All of the additional yarn I used was a washable acrylic/wool blend (Ella Rae Amity) or a superwash merino/wool blend (Nashua Creative Focus).
I used a G (4mm) hook.
I joined the squares this way.
The crocheted flowers were made according to a pattern from Linda Permann’s Crafty Crochet Embellishments class.
Before and after.
Next on the list? My aunt’s pillow(s). I can’t decide if I am making one pillow with granny squares on both sides, or two pillows each with squares on a single side. What will I choose??
P.S. ooh! ending this post on a cliffhanger is so exciting, don’t you think?
P.P.S. perhaps I need to get out more.


I love it! Can’t wait to fight you for it
I’m bringing it over today. Get your boxing gloves ready.
I recently finished knitting a tiny tea leaves cardigan and absolutely loved making it! It may have been one of my favorite things I’ve ever made.
Good to hear! I’m on the third ruched stripe of mine right now, and while I am enjoying it, I am realizing that my #7 needle is entirely too blunt. I either need a new one or a pencil sharpener 😉
Love this one! RT @lclarke522: On the blog today: Project :: Granny Square : Small Throw http://t.co/eNXgCWV
What a gorgeous blanket! There’s not much better than a good old granny square blanket
Thank you! And yes, I’m coming to that conclusion myself, with all of these projects lately…
You know… that granny square mini-quilt on the back of your favorite chair looks beautiful. In fact, that entire photo is so nice that it belongs in a Sunset Magazine.
Reading your post reminded me of two things: a, sitting at my grandma’s feet when I was very small, arranging and rearranging her granny squares in pleasing patterns on the carpet. (Thank you, grandma, for letting me explore color in such a fun way…)
And b, the gift of my grandmother’s yarns, crochet hooks, and knitting needles after she’d passed away. My daughter ended up being the one to really get into crochet, and I’ll have to pass this post along to her. I think it would be so appropriate for her to make granny squares from granny’s yarns.
I really am enjoying playing with my Granny’s squares. My only regret is that she isn’t here to show these projects to. I miss talking crafty talk with her.
I have to say that I heard it good and I remembered my granny about knitting that’s why I am enjoying seeing your craft. When I was young also I sit on my granny’s feet while arranging and rearranging her granny squares in pleasing patterns on the carpet.